
I think I will change it up a bit, after printing these parts I realized I could make it more simple by threading some cylinders on the lathe and making the springs swappable.
The two springs in the design shown are the same, they are just flipped.
BD's Mechanical Disk Recorder Build
Moderators: piaptk, tragwag, Steve E., Aussie0zborn
Re: BD's Mechanical Disk Recorder Build
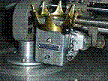
I have come to my senses a little regarding my spring design. before I was dealing with too many little parts. Two springs now sit on a riser with a spacer between them. The coils will be attached [possibly rewound] to a little cone that I made a forming jig for. Here's where I am at:
Incomplete aluminium cone jig:
Incomplete aluminium cone jig:
You do not have the required permissions to view the files attached to this post.
-
EpicenterBryan

- Posts: 738
- Joined: Sun Aug 10, 2014 9:01 pm
- Location: Eugene, OR USA
Re: BD's Mechanical Disk Recorder Build
Bennett, you are making great progress!Bahndahn wrote:I have come to my senses a little regarding my spring design. before I was dealing with too many little parts. Two springs now sit on a riser with a spacer between them.
It's so fun to see what you are up to!
I do wonder if the 2nd spring should be changed, making it a V spring to carry the vertical load from cutting - more like what Ciuens is up to. I'm not sure if the second (most outer) 3 point curved spring will serve that function.
Just a thought...
Bryan
Re: BD's Mechanical Disk Recorder Build
Hey Bryan,
Thanks for the tip! It's not too late for me to change that so I best be doing so!
Thanks for the tip! It's not too late for me to change that so I best be doing so!

Re: BD's Mechanical Disk Recorder Build
Hello Bahndahn.
Looking at the pictures, spring seems to be very thick, what material used? I'm doing some studies with this type of spring, but using PLA plastic with 0.75mm thick. Caruso head uses this type of spring, so I think it should work.
Your project is getting wonderful, congratulations.
Cheers
Ciuens
Looking at the pictures, spring seems to be very thick, what material used? I'm doing some studies with this type of spring, but using PLA plastic with 0.75mm thick. Caruso head uses this type of spring, so I think it should work.
Your project is getting wonderful, congratulations.
Cheers
Ciuens
Re: BD's Mechanical Disk Recorder Build
Hi Ciuens,Ciuens wrote:Looking at the pictures, spring seems to be very thick, what material used? I'm doing some studies with this type of spring, but using PLA plastic with 0.75mm thick. Caruso head uses this type of spring, so I think it should work.
The photos are deceiving as they include some spacers etc. Here is a picture of the one of the two springs [of same thickness] removed from the mount:
It is 0.67mm! I came to that thickness after just guessing around with a couple test prints. Considering there are two of them, their accumulative thickness is theoretically 1.34mm.
Are both of your springs [the main ones and the V-spring] 0.75mm?
Thanks for the positive encouragement!
You do not have the required permissions to view the files attached to this post.
Re: BD's Mechanical Disk Recorder Build
The main spring is 1mm, reduced curve. The second is 0.75mm.
If you increase this value, the stiffness increases and consequently the frequency of resonance. The problem is the amount of amplification to achieve the same result, especially at high frequencies, this is a big problem.
Currently in my cutting head, the main resonance is 650hz, is good for me, at least for now, hahaha.
Ciuens
Re: BD's Mechanical Disk Recorder Build
Hey folks,
It's been a while since I've updated my progress here but let me assure you it has not stopped! Heavy course load last semester really slowed me down, but now I'm full steam ahead working on a feedback cutterhead. I'm excited to share some of my discoveries over the next little while and am curious about your comments along the way.
I'm still working with the large surface transducer magnets and body and am now focusing on really nailing the bobbin, magnetic isolation, springs, and flexible coupling rods. After this is done, I will refine my torque tube design - so there's lots ahead, but I'm looking to really focus on this over the next 6 months.
The surface transducers are fine for now, and considering my cutterhead 45/45 body is all nicely made and anodized, I'm going to finish this cutterhead with these drivers. I do, however, want to make transducers from scratch and I believe I have made some discoveries I have not seen yet! More on that soon, but for now, lets focus on these drivers.
SPRINGS:
I'm still planning on 3d printing the springs for this–there is no foreseeable detriment here so theres really no need to get fancy with them. Many materials exist for 3d printing that may satisfy any variations needed from PLA or ABS.
BOBBINS/EXTENSION CONES:
Everybody listen up! I've freakin made a discovery that took 4 days and I'm happy to share it:
First, I tried a bunch of junky ideas. I started by making a nice jig on my metal lathe that is made of two pieces, its pretty self explanatory:
I went about wrapping sections of aluminium can around the various portions thinking I would solder the damn thing together and hope it remained true. I fumbled with crumpling tinfoil over the thing and considered somehow bonding the sheets together, I tried a number of ridiculous other things and none of them worked.
Until... Shhhhiiizzzzaaamm!!! I was struck with a baton of genius!
SPIN THAT SHIT! SPIN IT!! TURKISH BOWL-STYLE, BRASS INSTRUMENT HORN-STYLE, etc! What a freakin relief this thought was after days of fiddling around.
This is the best and possibly only way to do it! It is a dream come true: super rigid, super light parts that can likely be all one piece [feedback and drive bobbin, same piece]!
I am now going about machining the various tools, attachments for my lathe, and jigs to really fly with this idea. I did manage to make a few very promising examples. Here is a photo of the shallow transition of the jig pictured previously:
Beer can!
This thing is tough as nails too! It's wild. I hacked that puppy out with a chopstick on my lathe, but I'm making some real tools to do this on such a tiny scale.
More updates coming soon, just couldn't wait on that one.
Happy New Year!
You do not have the required permissions to view the files attached to this post.
Re: BD's Mechanical Disk Recorder Build
Nice one Bahndahn, that vid is mesmerising!
-
EpicenterBryan
- Posts: 738
- Joined: Sun Aug 10, 2014 9:01 pm
- Location: Eugene, OR USA
Re: BD's Mechanical Disk Recorder Build
Holy crap Bennett!
That changes everything!
That changes everything!

Re: BD's Mechanical Disk Recorder Build
For those who are interested in the details of this process, here are two helpful documents:
Popular Mechanics Handbook: Metal Spinning - Prof. Fred D Crawshaw [c. 1909]
https://archive.org/details/metalspinning00crawuoft
Machinery's Reference Series: Metal Spinning - Tuells, Painter, and William [c. 1912]
https://archive.org/details/metalspinning00tuel
Popular Mechanics Handbook: Metal Spinning - Prof. Fred D Crawshaw [c. 1909]
https://archive.org/details/metalspinning00crawuoft
Machinery's Reference Series: Metal Spinning - Tuells, Painter, and William [c. 1912]
https://archive.org/details/metalspinning00tuel
-
Fela Borbone
- Posts: 271
- Joined: Thu Mar 07, 2013 5:22 pm
- Location: Valencia, Spain
Re: BD's Mechanical Disk Recorder Build
Wow! Thanks for sharing .coooooooool!
Re: BD's Mechanical Disk Recorder Build
Made progress today with the spinning tools. Im working in two main roller tools so far, the photo shows the roller-head and the steel handle that will be installed on each. These will accommodate a fine and course-point wheel I will make soon.
I have not tracked down any information on spinning on a miniature scale, size and metal gauge included, but it seems pretty obvious that the miniaturization of the product requires the miniaturization of the process — these tools are small!
I have not tracked down any information on spinning on a miniature scale, size and metal gauge included, but it seems pretty obvious that the miniaturization of the product requires the miniaturization of the process — these tools are small!
You do not have the required permissions to view the files attached to this post.
-
Snug Music

- Posts: 299
- Joined: Sat Aug 15, 2015 5:23 pm
- Location: 28816 Stuhr / Moordeich LK Diepholz
Re: BD's Mechanical Disk Recorder Build
Hey Bahndahn..,
What u thinking about liquid metal ( Aluminium )?
http://bindulin-shop.de/de/produkt/spachtelmassen/1-komp_spachtel/bindulin_fluessig-aluminium_60g_tube__SPA10.html
Best regards,...Scotty
What u thinking about liquid metal ( Aluminium )?
http://bindulin-shop.de/de/produkt/spachtelmassen/1-komp_spachtel/bindulin_fluessig-aluminium_60g_tube__SPA10.html
Best regards,...Scotty
I'm still not a professional, but I learn pretty fast. especially with my eyes and ears!
Re: BD's Mechanical Disk Recorder Build
Hey there Scotty,
That adhesive looks unique. At the end of the day, it is simply a glue with aluminium dust in it, I believe. It certainly may add structural rigidity and other adhesives are found with this composition. Here is one that I have in my adhesives collection that is tried and true, this stuff kicks ass:
This resin and hardener combo is 'steel reinforced', so I can only assume that it has steel particles in it. These particles may or may not be magnetic, and may or may not add significant weight to the adhesive. All things to consider.
When it comes to adhering aluminium to aluminium, I think we cant go wrong brazing it with a little blow torch and some brazing rod. Real liquid metal once it melts! Heres some stuff I have been playing around with:
You can melt it with a little butane torch and it works like a charm! Worth a try if you are considering your options. On another hand, Ciuens and others have been mixing super glue and cotton to make a fiber-reinforced adhesive and I have also played with– the cotton really helps keep the super glue in the place that you need it and it seems to add structural integrity. Just pull apart some cotton balls and mesh it amongst the joints that you are adhering.
Cheers!
You do not have the required permissions to view the files attached to this post.
Re: BD's Mechanical Disk Recorder Build
Finished up the first tool for spinning. Yet to try it, but I will report back when I do.
You do not have the required permissions to view the files attached to this post.
Re: BD's Mechanical Disk Recorder Build
Alright here's a first go at it with the tool:
More of the same, but looking better and way easier to complete.
I should mention that I have been experimenting with a number of gauges of aluminium sheet, and I have come to one that works very well.
0.0011" = [29 Gauge] : sheet stock - excellent spinning characteristics for my application. Does not break easily when turning sharp corners yet is fine enough that it does not yield too heavy of a part.
0.00445" = [37 Gauge] - beverage can - (measures 0.0046" but is coated in a food-safe epoxy, so I rounded down to the nearest gauge) - forms very easily and breaks quickly even with little pressure applied. It is very useable, but it must be formed gently and quickly to avoid work-hardening. Yields very light weight parts.
0.00397" = [38 Gauge] - cheap baking tray - very easily formed but consistently breaks in forming regardless of how delicate the tooling is. Effectively unusable.
A number of thicker gauges were also tried including a range of gauges suggested in the literature, but all yielded parts of excessive weight. Spinning small parts with a higher gauge is not comfortable with my small setup. Greater leverage is required on tools with a greater mechanical advantage.
While I'm here, I will share an update on my path to feedback transducers. I want to make these as maintainable as possible, so I'm trying to make these screw together like a camera lens. These caps are my magnetic shielding plates, the smaller diameter will be threaded so that the magnet sandwich will be set into another cylinder and threaded down tight. Heres what I have so far:
That's all for now!
You do not have the required permissions to view the files attached to this post.
Re: BD's Mechanical Disk Recorder Build
I managed to assemble a rough prototype of the bobbin and cone structure I am considering for my design. The bobbin portion is made from a beverage can, the conical transition is made from spun 29 gauge aluminium sheet stock.
The two pieces were positioned on an aluminium jig and superglue was guided around the entire seam. The conical piece has a small lip on it that fits into the cylindrical bobbin, this holds it tight before gluing and allows for a nice tight fit and easy gluing– no superglue was found on the other side of this seam, so this one had a nice seal.
There is a small gap on the bobbin for for those EM effects to be rid of.
Here are four photos of the same piece:
You do not have the required permissions to view the files attached to this post.
-
EpicenterBryan
- Posts: 738
- Joined: Sun Aug 10, 2014 9:01 pm
- Location: Eugene, OR USA
Re: BD's Mechanical Disk Recorder Build
Nice Job there Bennett!Bahndahn wrote:There is a small gap on the bobbin
I think you have missed an opportunity though. You are using "beverage cans" not BEER cans!
What material are you making the final "cone extensions" out of? Are those also going to be spun aluminum?
Bryan