Hi everyone,
Well I think the journey is finally over and I am finally comfortable enough to claim that I've made a working, professional sounding record lathe.
It's been just over 14 months from the initial idea to the final "called it" stage I reached over the weekend. The hand made prototype was constructed back over the Christmas period of 2023 in just over 3 weeks. It worked (sapphire embossing cone on polycarbonate) but I wasn't really impressed with the audio quality and the consistency of a clean cut was just not there. We (Gold Coast Magic Records) considered going to market with a poly / embossed product but found that there would be more 'excuses' about how it's different to 'normal' record, and the customer ultimately doesn't care about PETG vs PVC vs PC, they just want a round flat record that plays well on their player at home.
Making the jump from a sapphire embossing cone to a diamond stylus seemed like a pretty big jump from where we were at. I knew the inaccuracies of the hand made lathe would not be tolerated by the diamond stylus and I needed a real solution to my dashpot, not just a convoluted spring / screw arrangement that I had. I needed to rebuild but I wasn't keen on doing this all by hand again, especially if I wanted spare parts to operate a working lathe.
The Snapmaker enters the scene...
As I was chasing re-making the hand made aluminium build into a CNC'd version, I happen to come across a FB marketplace ad for a Snapmaker 3-in-1. My focus was on the CNC tool head, and after a quick inspection I bought the machine thinking that the CNC was the way to go. The previous owner had tried some laser cutting, but unfortunately lost the safety glasses. This meant that: I had the laser tool on it, but no glasses. I had the CNC tool new in box, but no CNC designs ready to cut so I decided to plop on the 3D printer head just to 'try something' and honestly I've never looked back. It's been printing away, prototype after prototype and has allowed the progress we have made.
I'll break down the major areas, and briefly mention how I addressed that area for a solution:
Hardware
* Initially, repurposed a 3D printer, for the main X / Y carriage, with a threaded rod design
* On rebuild, printed supporting parts for a V-Slot 30mmx30mm designed frame
* Didn't use an optical device for the Y axis adjustment, I ended up making my own with stepper motor control
* I used an 8mm threaded rod and then found out about ball lead screws and bought a 16mm version and redesigned for it (definitely a major upgrade here)
Software / Hardware
* Custom C++ on Arduino, using a 3D printer's motherboard, with custom firmware: https://www.geeetech.com/wiki/index.php/GT2560
^ It just makes sense to use this as it already has everything a lathe needs to run: X / Y motor control, end stop sensors, PWM if required, fan control, and easily controlled via USB / Serial port interface.
Automation Control
* Custom software written in Python / PHP / JS.
* Python for the low-level backend lathe GCODE server (I just send my own set of GCodes to the lathe to operate it)
* Laravel / PHP / mySQL for the front end interface, with livewire for the front end application
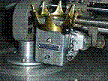
Cutterhead
* Version 1 - Based of @grooveguy 's design from this forum. It worked and was a great proof of concept but for me lacked power and headroom (19mm drivers are too small)
* Version 2 - I got some bigger 25mm, full-range drivers and went for a more 'Souri' type design for the torque tube arrangement as I've seen this design used by a few modern cutter heads that are around. This 'worked' however the vertical motions were out of control and causing pretty deep 'bad' phasing cuts on the discs.
* Version 3 - Back to a more classic Neumann style torque tube, same full-range drivers. I got closer with this head, but ultimately ran out of usable treble
* Version 4 - Kept the Neumann style as the lateral vs vertical motions were now 100% correct, upgraded to 50W tweeters, and... haven't looked back, it's done
I decided to 'print' in the 18 degrees VTA cutter head angle onto the head mount. The 45 degrees required for the drivers are part of the head enclosure design and lastly the critical 8-10 degrees rake angle needs to be applied as accurately as possible (soldered), to mimic the correct VTA / overall angles expected by the playback stylus.
It's quite shocking that only a few critical parts are required to be metallic (I choose brass). The torque tube is 1/2 plastic 1/2 brass!
Audio Electronics
My overall goal with the supporting electronics was what Phonocut claimed: Audio in -> cut record out.
Easier said than done right? Yes... but not impossible. I planned to use DSP to do everything I needed and again @grooveguy 's excellent write up lead me down the Sigma Studio path. It's the right path for me and now I have >all< the processing in 'the box' and have: Audio in -> amp ready / cut ready audio out
Audio processor features:
* Balanced audio inputs
* 5-stage Phono pre-amp
* Headphone monitoring w/ source switching (matched to the ohm)
* Brown-burr OPA2134 based design
* 24-bit 48KHz ADC/ DAC
* Input 18KHZ rolloff eq
* Elliptical filter, both low and high frequency mono summing
* Stereo separation control, 75% width of original source
* EQ bank, cutter head correction, with 28Hz low rolloff
* HF limiter, to ward off transient peaks going into the cutter head
* Peak level meter (this was more useful to me than a wide band compressor)
* Output 20KHz rolloff eq
^ This provides all the heavy lifting, and I can play straight from YouTube (or any other source) and the Vinyl Mastering is all done automatically, in real-time.
Stylus Heating
This came late in the game, as I wanted to make sure everything else was 'right' before I ran current through the stylus. Eventually after everything settled down, I had the confidence to flick the switch and try it out. Guys... there is no turning back, heated stylus for the win!
Overal Design
Well.. it's a mix of many people's open source designs. I'd say KNOP's open source Freecad files are the best start if you are serious in undertaking this project. Just keep in mind that he metal-printed the parts so 3D printed PLA isn't as strong and it might need some re-design (especially the main bearing plate).
So? What about some results?! Well.. I'm an EDM guy so these examples are influenced by that. Celia Cruz wav example is clear enough to hear the mp3 artefacts from YouTube!
https://drive.google.com/drive/folders/1eVCY1lRqWAWc5w2tE_EIQUHTmkwJI_zQ?usp=sharing
RonnieD The Magician
Gold Coast Magic Records
G.C.M.R Record Lathe
Moderators: piaptk, tragwag, Steve E., Aussie0zborn
-
themagician

- Posts: 19
- Joined: Tue Dec 12, 2023 4:33 pm
G.C.M.R Record Lathe
You do not have the required permissions to view the files attached to this post.
-
Fela Borbone
- Posts: 292
- Joined: Thu Mar 07, 2013 5:22 pm
- Location: Valencia, Spain
Re: G.C.M.R Record Lathe
Nice machine!
-
Thelatheofus

- Posts: 63
- Joined: Sat Apr 01, 2023 4:10 am
Re: G.C.M.R Record Lathe
Congrats, really nice build !
Which of those cutting heads is the final one ? The one on the right ? It sounds really good !
"I used an 8mm threaded rod and then found out about ball lead screws and bought a 16mm version and redesigned for it (definitely a major upgrade here)"
How is that ? Did you notice less noise with this type of linear rail ? I always thought ballscrews were noisier than a leadscrew (read it here a few times).
-
themagician
- Posts: 19
- Joined: Tue Dec 12, 2023 4:33 pm
Re: G.C.M.R Record Lathe
Cutter head, yes the one on the right, have completed as it's destined to be my spare. The completed working one is on the lathe right now.
Lead screw: It's the accuracy of the linear motion that is by far superior to the threaded row, noise wise time will tell if there is a real issue here or not.
Lead screw: It's the accuracy of the linear motion that is by far superior to the threaded row, noise wise time will tell if there is a real issue here or not.

Re: G.C.M.R Record Lathe
samples sound great! congrats on the successful build
making lathe cuts on a Presto 6N, HIFI stereo cuts on vinylrecorder
at Audio Geography Studios, Providence, RI USA
http://www.audiogeography.com
at Audio Geography Studios, Providence, RI USA
http://www.audiogeography.com
-
themagician
- Posts: 19
- Joined: Tue Dec 12, 2023 4:33 pm
Re: G.C.M.R Record Lathe
tragwag wrote: ↑Wed Mar 26, 2025 12:30 pmsamples sound great! congrats on the successful build
[/quote
Thanks @tragwag, I just followed your .com and was pleasantly surprised to have recognised you from my research into the field (from your YouTube video: How Lathe Cut Records Are Made). It helped me confirm some suspicions early in the project such as needing to have the ability to 'see' (VU Meters) and other things alike.
Thanks again and keep cutting!

Re: G.C.M.R Record Lathe
great work! how did you get on with the Airpot? I've got one and plan to use it on my lathe but some of the fixings seem like they might have some play in them.... we're not sure if it'll be a problem or not....
-
themagician
- Posts: 19
- Joined: Tue Dec 12, 2023 4:33 pm
Re: G.C.M.R Record Lathe
The airpot was a game changer. I have read other swear by an oil based dashpot and it might be the case that this is a better choice(?) I can't say for certain expect that our cuts stabilsed enormously even there is still some vertical motion from any unevenness present during the disc's rotation.
-
grooveguy

- Posts: 467
- Joined: Thu Jun 22, 2006 5:49 pm
- Location: Brea, California (a few miles from Disneyland)
- Contact:
Re: G.C.M.R Record Lathe
Very commendable job, RonnieD, congratulations... and thanks for the PM with the link to this thread. Your music samples are stellar, and I'm encouraged by your good results cutting into plastic. You don't mention suction, and with a hot stylus I can't imagine that you don't use vacuum. Any troubles with diamond-cut swarf? Many trolls report that it's difficult to get rid of. Good work!
-
themagician
- Posts: 19
- Joined: Tue Dec 12, 2023 4:33 pm
Re: G.C.M.R Record Lathe
Hi Jim!
Thanks again for your support and excellent write up. Yes I definitely use a vacuum setup, it was quite the challenge to get the correct curvature in the metal straw I used vs the printed attachments that I used to couple it to the lathe. I ended up printing and additional rail that allowed greater vacuum tube adjustment, whilst it was mounted in place. It took a few hours prior to printing this rail to adjust as it was an all on - check - take off - adjust a few mils - all on again cycle.
The actual vacuum is a domestic model, with a custom printed swarf tube cover, that I modelled off the original plastic lid that came with this $3 jar.
The bottom filter is seen on one of the images and is simply glued on. It's a two piece print to avoid using supports, hence the boiler plate style coupling with the hex nuts.
You do not have the required permissions to view the files attached to this post.
-
themagician
- Posts: 19
- Joined: Tue Dec 12, 2023 4:33 pm
Re: G.C.M.R Record Lathe
Update:
I ended up re-visiting the EQ and stereo image tuning on my processor late last night, did another test cut this morning.
I've always had the comment (throughout my audio career if you could call it that) that my mixes are a bit too bass heavy, as it's my preference being an EDM junkie, a personal audio demon if you like
Anyway, I went against my ears and just stuck to the data that was in front of me telling me to attenuate -11dB at 10Hz with a very low Q of 0.138... Seemed extreme as this was essentially a low shelf eq but I trusted the figures, created the bi-quad numbers (using a python script / app shared on this board and on github) and here are the results!
https://drive.google.com/file/d/1z1K-ae313WOaEj8wpXHpRCOxelBEOgDa/view?usp=sharing
-
themagician
- Posts: 19
- Joined: Tue Dec 12, 2023 4:33 pm
Re: G.C.M.R Record Lathe
Automation Update:
Completed a box for our PSU and I decided to combo it with computer controlled relay switching module for our Vacuum and Stylus Heating, thus automating both functions into the (already automated) cutting sequence.
Closer image of the vacuum metal straw / tube setup with additional rail mentioned prior.
Additional image of a cable chain I scaled up a tad straight from the thingiverse!
You do not have the required permissions to view the files attached to this post.
-
Thelatheofus
- Posts: 63
- Joined: Sat Apr 01, 2023 4:10 am
Re: G.C.M.R Record Lathe
Again, really nice build !
What's your experience and inspiration for the 3D printing designs ? You seem to have chosen nice manufacturing technics that fit 3d printing nicely. I ended up buying way too many parts that I could have printed myself, or going with connection methods (with classic blots and nuts) that work but are not optimal for 3d printing.
If I had to go back now and build a machine with more experience and knowledge about 3D printing I would copy a lot of Chris Borge's designs : https://www.youtube.com/@Borgedesigns/videos
A couple of questions about your cuts, how loud can you get before getting signification distortion ? Did you measure the rake angle of your stylus and the disk ? It seems to be a lot, but so does the T560.
-
themagician
- Posts: 19
- Joined: Tue Dec 12, 2023 4:33 pm
Re: G.C.M.R Record Lathe
Hi Thelatheofus,
Some great questions here:
* Experience with 3D printing *
Not too much recently (this decade) until a purchased my SnapMaker (thinking I was going to use the CNC head predominately)
About 12yrs ago, was gifted an 'almost working' rep-rap / huxley style 3D printer. I worked on that thing quite a bit and managed to get it to print 'something' but it was never great, every layer introduced new conditions that needed to be adjusted etc. It was very much 'hard work'.
* 3D designs / designing *
KNOP's open source designs provided a great basis for the main carriage and main bearing plate. After thoroughly reading through his build notes, I decided that If I was going to go down this track, I would want to print with PLA not send off to get metal parts 3D printed up by a third party. I simply just didn't have enough knowledge in this area and knew that a [ design / print / test / adjust design ] rinse and repeat cycle was probably going to happen.
Looking at the wide landscape of available CAD software, I eventually settled with Fusion360, as it allowed me to use some prior (20yrs ago) knowledge of AutoCad and it's general principles. Learning Fusion 360 was a little frustrating to be honest, I always 'know' exactly what I want / what I need to make and sometimes the execution it lacking (due to lack of experience on the software). Eventually though, I got good enough to be able to throw in exisiting designs and chop then up and alter as I needed.
Thanks so much for the link to Chris Borge's YouTube Channel (he is an Aussie to boot!). YouTube is a fantastic resource, it's my 'library' and yes I do pay for it, worth every penny. I found Slant3D to be quite informative for tips-and-tricks, especially for me since I had to alter my modelling to aim for a printable structure, e.g. supports vs no-supports, the angle of larger pieces, contact area on the bed and most useful tip I found were these spoke-like rod coupling ends that I used to hug the main carriage rods. They are great as they have a slight flex due to the design, I think Slant3D called them zero-tolerance coupling. I've attached an image of our record clamp with this method (thanks SpinnerTownBlanks for giving me the idea of just printing my own after reaching out to them for advice on a clamp).
https://www.youtube.com/@slant3d
* Nuts and Bolts *
Well my first build was hand made out of aluminium parts and nuts and bolts everywhere. It 'worked' (kinda) but the most frustrating thing was waking up everyday to a different set of complications / issues that were not there the day before! 3D printed fixed this, and then overnight I would work on the 'next bit' without concern about yesterday's bit etc. This really was the game changer, and as I replaced all my hand made parts with printed parts, this stability increased. There are still some nuts / bolts in the 3D printed version, but no where near as many as the metal hand made version.
* Recording Level *
Well... I'm still pushing this to determine. I can hear the actual head's audio starting to exhibit mechanical compression distortion at higher audio levels, can quite comfortably cut at 0dB at all frequencies and the head just sits there doing it.
Here is a short example of a hot +12dB cut:
Source from 20 secs on: https://www.youtube.com/watch?v=b4ZuXajqL8M https://www.youtube.com/watch?v=b4ZuXajqL8M
Recording:
An mp3 version is attached here, wav file on Google Drive
https://drive.google.com/file/d/1wmMHZ_a6XNmyWR4zblhhaSHoPko_g3EN/view?usp=sharing https://drive.google.com/file/d/1wmMHZ_a6XNmyWR4zblhhaSHoPko_g3EN/view?usp=sharing
* Rake Angle *
Arguably, the most important angle of the lot! Sure we all know the 45 degree angle that the drivers exhibit, it's kinda intuitive to be honest however the rake angle is more esoteric. I ended up printing up an A3 card with the angles required and a template (If I can find this file I'll share it with everyone). Why rake angle at all? Well I'm no expert but this is what I understand (others with more knowledge here please correct me if wrong) - It's a too fold purpose, firstly the angle at which the stylus's tip comes into contact with the blank, not enough angle vs too steep has a direct effect on the quality of the cut as this angle with either help or hinder you stylus from doing what you are asking it to do. Secondly, the rake angle provides support to the VTA (vertical tracking angle, mine is set at 18 degrees), and it really does work, my stereo separation is quite decent now, post processor magic. Why 8 degrees? It's recommended by MyShank and I'm using their stylus on this cutter head, it works!
You do not have the required permissions to view the files attached to this post.
-
Thelatheofus
- Posts: 63
- Joined: Sat Apr 01, 2023 4:10 am
Re: G.C.M.R Record Lathe
Nice, cheers for the detailled reply !
It's knop's and the lockdown lathe that motivated me to do this aswell. But I had a hard time sourcing many parts needed for the lockdown lathe, and I wanted an automatic head drop feature so I ended up designing my own lathe.
I should have used fusion 360 aswell, I'm using Inventor and I feel like it's going to limit me at some point.
I'm tempted to try that clamp aswell, nice design !
About the level, going through my collection I've seen that most of my records are between +9 and +12 dB (mostly house and dance music, the aim is to play those lathe cuts in clubs), so that's what I'm aiming for, but with homemade cutting heads it's hard not to get mad distortions at this level. Yours seem to fair pretty well !
And about the rake angle that's also what spinner town recommend, just from the pictures it looked like more than that (some T560s go up to 15° iirc).
-
themagician
- Posts: 19
- Joined: Tue Dec 12, 2023 4:33 pm
Re: G.C.M.R Record Lathe
Good sleuthing regarding the rake angle based of other T560s.
During the initial investigation phase, I looked everywhere to find (any) cutter head images to reverse engineer this (and other angles / techniques).
I did find some T560 that had quite an aggressive rake angle and finally settled on My Shank's recommendation, which is a max angle of 10 degrees.
Frankly I wouldn't want to push it further than the 8 degrees that is recommended.
Cutting levels:
Level wise, it's the main reason I kept upping the driver wattage as I felt I wasn't getting enough level out of the cuts.
Others here will correctly point out that more weight = more power needed anyhow so it's a balance to get it right anyway.
I don't think I could go any larger at this stage with the drivers as it's getting pretty close to crashing into the centre spindle.
It's a bit of compromise here and there to get what you want.
What's Next?
Now, I'm onto the next upgrade: Auto LPI correction...
Since my lathe runs off async GCODE (I rewrote Marlin source code to achieve async calls here), I can simply send updated LPI commands as the lathe is cutting.
My thoughts here to calibrate my thresholds here are:
Identify a set of test frequencies, e.g. (50Hz, 100Hz, 1KHz, 5KHz, 10KHz)
Presumably the lowest frequencies will have the largest excursions on the disc.
Calibrate playback with a test record against 0dB
Run the lathe at the tightest LPI that will accurately track, with a silent groove.
Use the playback tone arm while cutting for monitoring the signal in real-time
Slowly increase the amplitude on the current test tone, and keep doing so until tracking 'fails'.
Record this dB as the fail point for this LPI / Frequency / dB combination.
^ rinse and repeat for all target LPIs and frequencies.
In the end, this will yield a table of LPIs the frequency used to test and the amplitude at which it no longer could track.
Leaving some headroom (about 6dB or so before failure), this becomes the max amplitude at that freq at that LPI.
Put all of those figures into a program and then use python / scipy /numpy to auto calculate the LPI speeds for any given track as it's imported into our record catalogue. This isn't a far stretch, as we auto-level the music as it's imported now to give a consistent cut every time.
Output this as an index file, stored along side the wav. e.g. : 1.wav ; 1.idx
I'll then update my main controller to read idx file (if found) and use them.
The idx files will contain a comma separated time-stamp and an LPI value, nothing more is required.
As the record cuts, if the time-stamp is elapsed, then update the LPI, easy!
^ Let's see if it's as simple as I make it out to be, gimme about a or so week and I'll report back, away in Melbourne at the moment!
RonnieD
-
themagician
- Posts: 19
- Joined: Tue Dec 12, 2023 4:33 pm
Re: G.C.M.R Record Lathe
Forgot to mention I've written an app to help the above Auto LPI work, it's crude but works.
If there is any interest from anyone I can post the source up on Github to share however it's quite custom as I mentioned, it sends GCODE to my lathe to adjust the LPI...
Happy cutting!
p.s. Those LPI values aren't real LPI values, it's the internal interrupt delay times for the lathe stepper motor movement sequences. Perhaps when all this is done I'll convert these to get real LPI figures but honestly I don't care that much. No customer is ever going to ask me "what LPI" I can or do cut at, they only care about the related "how much music per side?".
You do not have the required permissions to view the files attached to this post.