how-to emboss
Moderators: piaptk, tragwag, Steve E., Aussie0zborn

Re: how-to emboss
Yes I did mention the power level in several posts. The reason for using that amp circuit was because I wanted to try to keep as much of the same brand as possible. In the morning after work I am going to a used car audio shop I know of that may have a 12 volt Sony Explode car amplifier. Trying to keep it 12 volt because I want the lathe to continue to be portable and self powered. The lithium batteries can put out up to 25 amps before being permanently damaged.

Re: how-to emboss
cool!
glad that works for you.
I think that trial and error is just as useful as someone explaining it to you.
so congrats on figuring something out that works for you!
glad that works for you.
I think that trial and error is just as useful as someone explaining it to you.
so congrats on figuring something out that works for you!
making lathe cuts on a Presto 6N, HIFI stereo cuts on vinylrecorder
at Audio Geography Studios, Providence, RI USA
http://www.audiogeography.com
at Audio Geography Studios, Providence, RI USA
http://www.audiogeography.com

Re: how-to emboss
The reason for your low outpt is simple.. You were running 2x 25watt coils on a 20 watt amp. Not enough power...
And as for the right amp to use... As there are so many different systems out there with differing requirements the answer will depend on the system that you use.. Mono or Stereo, Feedback or Non Feedback... Ive heard of some pro neumann systems running on 400watts and then there are portable systems like presto which can do an excellent job with a mere 10 watts...
Qudos on building your own system - I take my hat off to anybody who has a go at building their own system no matter how good or bad the results... what matters is that you havnt given in to the digital society that we live in today...

-
Fela Borbone
- Posts: 292
- Joined: Thu Mar 07, 2013 5:22 pm
- Location: Valencia, Spain
Re: how-to emboss
Hello trolls!
My experiece in embossing is just a few minutes long,before burning the coils of my DIY lathe, so I'm not an expert, but I see some confussion about angles.
As embossing is not an standard practise,may be we don´t have standard definitions concerning it.I did a search, but may be I didn't search in the rigth way, As you already noticed,English is not my native language.The following is more a cuestion for an experienced in embossing to answer, rather than an statement.Also I'm not experiencied in writing in forums,moderators, fell free to move the post to another section.
When cutting, no problem about angles, cutting angle is (more or less) 90 deg. and so is shank angle (may be some excepcions) but at embossing we read "I emboss with a needle at 45 deg."or "With saphire backwards, but at 90 deg",Where is the "embossing angle"?Maybe it already has a another name("attack angle?"), and this was written before, if so, accept my apologies and I'll edit this post.
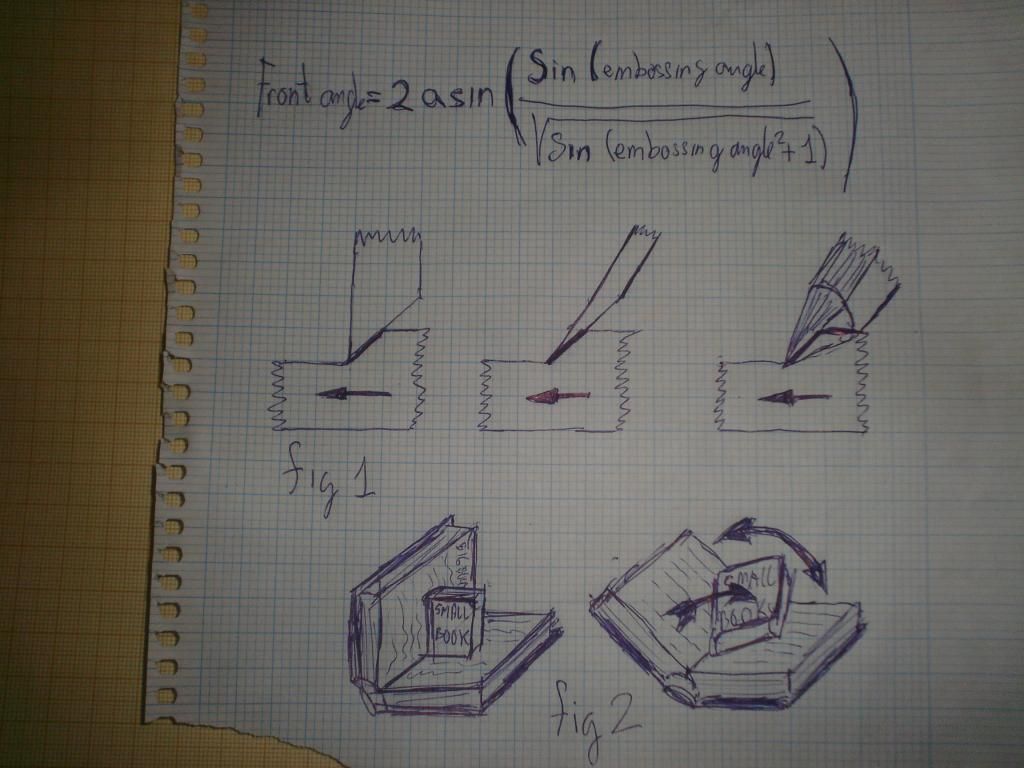
In the 3 drawings of fig.1(see photo bellow) may be we have the same embossing angle, but in different ways.First, lets say a saphire backwards, the second a plotting blade and the 3rd a sharpened needle.
1st.- shank angle= 90 deg. heel angle= 45 deg.
2nd.- shank angle= 55 deg heel angle= 10 deg.
3dr,- shank angle= 55 deg cone angle= 20 deg.
Shank angle is measured relative to the disc surface, and heel angle, relative to shank
Can we say, for a faceted stilus: embossing angle= shank angle-heel angle?
or for a cone(needle) : embossing angle= shank angle-cone angle/2?
So,if tilting the stylus shank can be tricky in a given type of lathe,why not just change the heel angle and keep the shank 90 deg?Of course,the results in the tree cases may differ, as the contact surface during the act of embossing is different.Different polished finish, weigth applied to the stylus for a traceable groove,and abbility for higer frequencies may be affected?
So, for "embossing angle" i will mean the angle defined by the part of the stylus forming the groove width.
For "front angle" I mean the angle you see when facing the stylus frontal,paralel to the shank, not the heel.In a shaphire,is around 90 deg,in a cone, is the angle formed... well...two times the angle the needle was sharpened
But,how to get a 90 deg groove with a 70.deg angle (front wiew)stylus? tilting it 45 deg! What happens if we emboss with a standard saphire tilted 45 deg?We get way more than 90 deg, 122deg, aprox,
If you can't picture it mentally, grab a big book and a small book and have a look at fig2. The big book represents the groove and the small book the stylus. Tiltintig the stylus (relative to both surfaces of the big book equally!) you will experience how the groove angle changes.
The relation embossing angle (enb)/forming angle is (If i'm not wrong) Frontangle=2asin(sin(emb)/squrt(sin(emb)^2+1))For making this post not too long,I will not say how I got there.The practical results, in the following table:
5-9.9621
10-19,7021
15-29.0216
20-37.7634
25-45.8196
30-53.1301
35-59,6751
40-65.4648
45-70.5287
50-74.9074
55-78.6453
60-81.7867
65-84.3725
70-86.4383
75-88.0140
80-89.1229
85-89.7815
90-90
Well,in real life we don't need that precision, but may be usefull for further calculations.
It all means, if we embossing at 45deg, a plotting blade o a needle that has a 70 deg point will give a 90 deg groove,and if we are using saphires, tilting them till 70 deg will give only a sligthly wider angled groove,But if you tilt it more, you will have problems with people from RIAA!
If embossing at 15 deg, a needle whith a 30 deg point will give a 90 deg groove.
Corrections from real embossers are very welcome!
My experiece in embossing is just a few minutes long,before burning the coils of my DIY lathe, so I'm not an expert, but I see some confussion about angles.
As embossing is not an standard practise,may be we don´t have standard definitions concerning it.I did a search, but may be I didn't search in the rigth way, As you already noticed,English is not my native language.The following is more a cuestion for an experienced in embossing to answer, rather than an statement.Also I'm not experiencied in writing in forums,moderators, fell free to move the post to another section.
When cutting, no problem about angles, cutting angle is (more or less) 90 deg. and so is shank angle (may be some excepcions) but at embossing we read "I emboss with a needle at 45 deg."or "With saphire backwards, but at 90 deg",Where is the "embossing angle"?Maybe it already has a another name("attack angle?"), and this was written before, if so, accept my apologies and I'll edit this post.
In the 3 drawings of fig.1(see photo bellow) may be we have the same embossing angle, but in different ways.First, lets say a saphire backwards, the second a plotting blade and the 3rd a sharpened needle.
1st.- shank angle= 90 deg. heel angle= 45 deg.
2nd.- shank angle= 55 deg heel angle= 10 deg.
3dr,- shank angle= 55 deg cone angle= 20 deg.
Shank angle is measured relative to the disc surface, and heel angle, relative to shank
Can we say, for a faceted stilus: embossing angle= shank angle-heel angle?
or for a cone(needle) : embossing angle= shank angle-cone angle/2?
So,if tilting the stylus shank can be tricky in a given type of lathe,why not just change the heel angle and keep the shank 90 deg?Of course,the results in the tree cases may differ, as the contact surface during the act of embossing is different.Different polished finish, weigth applied to the stylus for a traceable groove,and abbility for higer frequencies may be affected?
So, for "embossing angle" i will mean the angle defined by the part of the stylus forming the groove width.
For "front angle" I mean the angle you see when facing the stylus frontal,paralel to the shank, not the heel.In a shaphire,is around 90 deg,in a cone, is the angle formed... well...two times the angle the needle was sharpened
But,how to get a 90 deg groove with a 70.deg angle (front wiew)stylus? tilting it 45 deg! What happens if we emboss with a standard saphire tilted 45 deg?We get way more than 90 deg, 122deg, aprox,
If you can't picture it mentally, grab a big book and a small book and have a look at fig2. The big book represents the groove and the small book the stylus. Tiltintig the stylus (relative to both surfaces of the big book equally!) you will experience how the groove angle changes.
The relation embossing angle (enb)/forming angle is (If i'm not wrong) Frontangle=2asin(sin(emb)/squrt(sin(emb)^2+1))For making this post not too long,I will not say how I got there.The practical results, in the following table:
5-9.9621
10-19,7021
15-29.0216
20-37.7634
25-45.8196
30-53.1301
35-59,6751
40-65.4648
45-70.5287
50-74.9074
55-78.6453
60-81.7867
65-84.3725
70-86.4383
75-88.0140
80-89.1229
85-89.7815
90-90
Well,in real life we don't need that precision, but may be usefull for further calculations.
It all means, if we embossing at 45deg, a plotting blade o a needle that has a 70 deg point will give a 90 deg groove,and if we are using saphires, tilting them till 70 deg will give only a sligthly wider angled groove,But if you tilt it more, you will have problems with people from RIAA!
If embossing at 15 deg, a needle whith a 30 deg point will give a 90 deg groove.
Corrections from real embossers are very welcome!
-
Fela Borbone
- Posts: 292
- Joined: Thu Mar 07, 2013 5:22 pm
- Location: Valencia, Spain
Re: how-to emboss
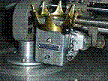
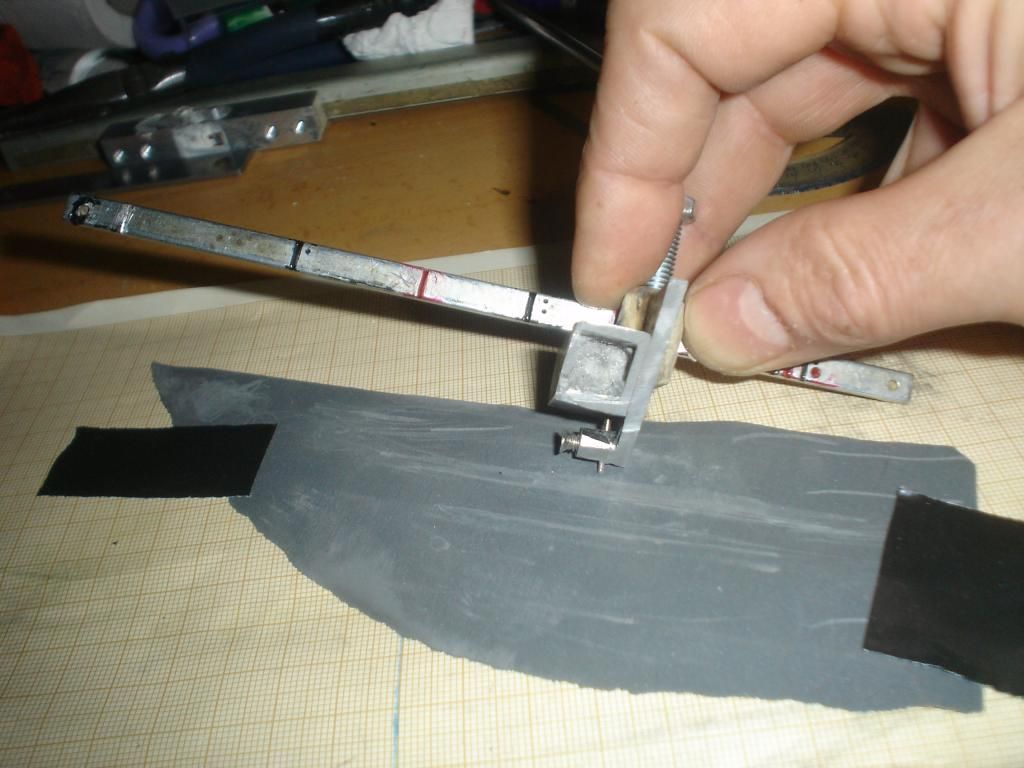
BTW, here´s a picture of my tool for sharpening drill points with 90deg front and variable heels.
The long bar has marks, adjusting it forward an backwards, the resulting triangle touching the table varies, ans so do the angle of the resulting heel of the stylus.
The long bar has marks, adjusting it forward an backwards, the resulting triangle touching the table varies, ans so do the angle of the resulting heel of the stylus.
Re: how-to emboss
Hi,
Most of the commercial systems I've see (e.g. Soundscriber) use conical tips that lean back about 30-45 degrees. The problem with this method is:
1. U shaped grooves that don't track well with a standard playback stylus geometry. (Most systems had a complementary playback stylus).
2. Not well suited to stereo playback.
3. Limited high frequency response due to "self erasure".
If you PM me with you email, I can send you a copy of a paper that discusses the high frequency limits using a conical embosser.
I can see the merits of what you are trying to do: Emboss or impress a groove geometry that works with a standard playback stylus. This is not so easy because if you emboss with sharp facets in your stylus, you are right edge of transitioning from embossing to cutting.
Have you considered that even if you are able to form such a groove, you still have to make sure that any stereo information you emboss meets the standard 15-20 degree vertical tracking angle?
Mark
-
pentlandsound

- Posts: 75
- Joined: Mon May 16, 2011 11:25 am
- Location: Edinburgh, Scotland
Re: how-to emboss
Fela Borbone, many thanks for your detailed and informative post on indenting / embossing stylus angles. I'm developing a lathe and (mono) recording head using embossing, rather than cutting, and I have been puzzling over how to calculate the angle of the indenting point correctly. The following is what I came up with, having wrapped a wet towel around my head and scoured my memories of 30 years ago for remnants of school trigonometry:

Figure 1 shows a section of a groove cut in the usual manner. This section is perpendicular to the disc surface: the groove has depth d, the angle LBR between the groove walls is 90° and thus the width of the groove at the surface LR is 2d.
Figure 2 represents the groove seen from the side. The line BC represents the same as it did in figure 1: that is, the dead centre of the groove. For an indenting point set at 30° from vertical, its triangular cross-section is represented as the line BC'. The height of this inclined cross-section - not the depth of the groove - is thus d/cos 30°, or 1.155d.
Figure 3 represents the inclined triangular cross-section of the indenting point, seen from the front. As in figure 1, its width is still 2d, but its height (from figure 2) - again, not the groove depth - is 1.155d. The angle L'BR' is thus 2.atn(1/1.155) or 81.8°. This is the angle to which an indenting point must be ground to make a 90° groove if angled 30° from vertical.
I think you've got the same results as I have, but by different calculations: I'm measuring the angle of inclination from vertical, rather than from horizontal. It seems to boil down to: stylus point angle = 2.atn(cos(inclination angle)).
Corrections gratefully received!
David
Re: how-to emboss
Discovered this by accident David. I found the angle shape of the emboss tip had to be changed due to the angle of attack because it created a wider groove than expected making for some very odd sounding stereo LOL. The end result "looks" like a 90* groove being 45 by 45 to the surface. Please forgive my simple mind. lol
-
powerstrip

- Posts: 269
- Joined: Sun May 08, 2011 10:02 am
Re: how-to emboss
Slightly ungrateful comment considering the contribution these guys make. I did my first cuts without help from this board, but when I wanted to start getting GOOD results I started digging through the archives here.DjMikiRia wrote:...why didn't anyone tell me 20 watts was not enough to emboss ...You people need to inform noobies that power is as important as anything else doing this. ...
Disc recording is often a crash and burn process. Why didn't anyone tell me the carriage screw lock nuts on my presto 6n should have been snugged in, then lightly tightened in order to prevent carriage vibration?
The stylus began to vibrate up and down, then it jumped and skipped hard enough to cut through the acetate , into the aluminum, and ruin a $100 stylus
Now I know: bad angle, loose carriage, and too much weight. I had to cut test strips on about 8 red label audio discs with test cuts before getting a decent result.
It's trial and error. Noobies can't expect to jump right in and get 'turnkey' results. We have to pay dues as self taught apprentices.
Miki ria is doing great work though. At this rate, she should be on top of the game in no time. Great innovation and fast pickup!!
-
Fela Borbone
- Posts: 292
- Joined: Thu Mar 07, 2013 5:22 pm
- Location: Valencia, Spain
Re: how-to emboss
Mark,
Thanks!
Yes, you are right, a tilted stylus is like a long ship performing sudden direction changes on the sea,for a short ship may be more easy!(Well not an exact analogy, the ship and the stylus don't turn same way)
David,
Is funny, we get exact the same resuts...but mirrored!, so both are rigth (I did it too complicated, your way is better!)you measures related to vertical and me to the disc surface
Feeding 45 deg in both formulas the result is exactly the same,70.5287.
Feeding 90 in yours gives 0, in mine gives 90.
Feeding 0 in yours gives 90 in mine gives 0.
And all intermediate values match, but mirrored.
Re: how-to emboss
I have discovered different styli substances give better results at different angles. I have experimented with surgical steel, heated sapphire, glass, and even titanium. 22* angle of attack in the direction of rotation with a steel stylus shaped 90* (L/R 45*) works overall best. Less highs but longer lasting and less fragile than a glass stylus I made which DID give better highs, but was so thin it did not last long before chipping under the weight of the lathe arm.

Re: how-to emboss
I know this is an old thread but I keep coming to it for info so thought its as good a place as any.
I met peter king today, he showed me around his place,, really nice guy and seems to be on the mend.
He did tell me some interesting things about embossing, possibly even some of the innovations he's made over the recent years.
Hes grinding his needles to a 90 degree point, that is, 45+45 if that makes sense. Once they are ground he runs them in on a scrap record for 5 minutes or so, until the groove becomes completely silent. (And it works really really well..)
He prepared the discs by wiping them with CRC to remove the adheisive from the protective wrapper, then he applies turtle wax -doesn't let it dry then wipe off, applies it wet and keeps applying it until it's all rubbed in.
No real details on temperature I think his words were lukewarm.
Anyways, those were the things that surprised me, I've attached photos of his embossing stylus and how far back he is leaning his head.
You do not have the required permissions to view the files attached to this post.
Record Lathe Embossing Supplies + Embossed Records - http://www.johnnyelectric.co.nz/
Re: how-to emboss
And the fidelity is pretty crazy good, especially on his bbc machines
Record Lathe Embossing Supplies + Embossed Records - http://www.johnnyelectric.co.nz/

Re: how-to emboss
When you say "Turtle Wax" would this work?jjwharris wrote:then he applies turtle wax -doesn't let it dry then wipe off, applies it wet and keeps applying it until it's all rubbed in.
https://www.amazon.com/Turtle-Wax-T-223-Super-Shell/dp/B000BPSVJ6/ref=sr_1_3?ie=UTF8&qid=1506713692&sr=8-3&keywords=turtle+wax
or this?
https://www.amazon.com/Turtle-Wax-T-123R-Super-Liquid/dp/B0009JKGEM/ref=sr_1_15?s=automotive&ie=UTF8&qid=1506713760&sr=1-15&keywords=turtle+wax
Re: how-to emboss
Yup it's the first one in the tin.
I bought a juicer and attached a platter to the spindle, so im using that to spin the blank, then i wipe the crc in, followed by the turtlewax, on the high speed spinnint platter. Before I cut I wipe the disk on the turntable to remove any dust
I bought a juicer and attached a platter to the spindle, so im using that to spin the blank, then i wipe the crc in, followed by the turtlewax, on the high speed spinnint platter. Before I cut I wipe the disk on the turntable to remove any dust
Record Lathe Embossing Supplies + Embossed Records - http://www.johnnyelectric.co.nz/
-
discosdecorte

- Posts: 142
- Joined: Tue May 21, 2019 1:01 pm
- Contact:
Re: how-to emboss
Hi!
I've got a few questions about embossing with an ATOM A-101
- I've read (in this awesome forum) that this machine can emboss using a tungstene needle, putting it backwards. Is it very difficult to put the needle backwards? Any tips?
- Which polycarb should I use? Any or a specific one? Recommended thickness? Is there any "domestic" material I could use for my trial/error first cuts?
Best regards,
Fer
🄳🄸🅂🄲🄾🅂 🄳🄴 🄲🄾🅁🅃🄴
www.instagram.com/decortediscos
www.instagram.com/decortediscos

Re: how-to emboss
Tungsten needles are cones, so there is no "backwards"... they can be used on any face, and then once that face is used up, you can usually turn them and get a clean face and get some more cuts. they can be turned a few times. The tungsten that Farmer John (thefarmerjohn//at//gmail//dot//com) is making nowadays have been greatly improved and are the best out there. He doesn't sell on ebay, though, only thru email.
Sapphire Embossing Cones (I sell through http://www.recordlatheparts.com) are more expensive, but have a lot more clarity in the high end.
I would recommend using Farmer Johns tungstens while you are getting to know your machine... then once you have, upgrade to sapphire embossing cones.
(The "backwards sapphire" trick from years ago was for sapphire cutting styli from Apollo, which are way more expensive than sapphire embossing styli, and in my experience much harder to dial in properly).
I Buy/Sell/Restore Vintage Machines/Parts and Provide Phone/In Person Tech Support
www.MichaelDixonVinylArt.com
www.LatheCutCamp.com
www.RecordLatheParts.com
www.MobileVinylRecorders.com
www.LatheCuts.com
www.MichaelDixonVinylArt.com
www.LatheCutCamp.com
www.RecordLatheParts.com
www.MobileVinylRecorders.com
www.LatheCuts.com

Re: how-to emboss
jjwharris wrote:Yup it's the first one in the tin.
I bought a juicer and attached a platter to the spindle, so im using that to spin the blank, then i wipe the crc in, followed by the turtlewax, on the high speed spinnint platter. Before I cut I wipe the disk on the turntable to remove any dust
Is CRC a brand of alcohol-based cleaning fluid? I'm just spraying Turtle Wax car cleaner in spray form, but it's a pain using a spray cos i end up polishing my floor to lethal levels at the same time
looking for a better method...
Re: how-to emboss
I have seen in youtube someone use Turtle Wax in jelly form, maybe you should give it a try.symatic wrote:jjwharris wrote:Yup it's the first one in the tin.
I bought a juicer and attached a platter to the spindle, so im using that to spin the blank, then i wipe the crc in, followed by the turtlewax, on the high speed spinnint platter. Before I cut I wipe the disk on the turntable to remove any dust
Is CRC a brand of alcohol-based cleaning fluid? I'm just spraying Turtle Wax car cleaner in spray form, but it's a pain using a spray cos i end up polishing my floor to lethal levels at the same time
looking for a better method...
Best,
Bob
Re: how-to emboss
boryo wrote:
I have seen in youtube someone use Turtle Wax in jelly form, maybe you should give it a try.
Best,
Bob
I will look out for some - I was thinking about the cleaning of the plastic first though. I just apply the Turtle Wax spray after peeling off the protective film from my Polycarbonate blanks, but I'm wondering if I should be cleaning them at that point.