I thought it would be a good idea to start a thread about embossing. There are bits and pieces all over the forum, but it seems like a very promising technique for cutting pvc.
Sounds like it reduces stylus wear and noise floor, which is great for those using their lathes a lot to produce multiples.
Any advice from users who practise, or have experimented with, this way of cutting?
here are the questions I was left with after browsing the forum on the matter:
How can the stylus be mounted properly in the head if it is backward? Esp. a Grampian-type which has a flat side that aligns the stylus ... this flat area would not function if backward.
How can the stylus end up at 45 degrees, when using a short-shan stylus, since there is not nearly enough space between the cutterhead and the blank to achieve this.
Are sapphires suitable or only diamonds?
Is a heated stylus useful really? Is it necessary to heat the blank (if using PVC)
how-to emboss
Moderators: piaptk, tragwag, Steve E., Aussie0zborn
-
marchingband

- Posts: 34
- Joined: Mon Mar 17, 2008 12:47 am
- Location: halifax, canada

Re: how-to emboss
I don't emboss, but based on the info I've gotten from Tommie and Peter King, here are the answers to your questions as I understand it.marchingband wrote:I thought it would be a good idea to start a thread about embossing. There are bits and pieces all over the forum, but it seems like a very promising technique for cutting pvc.
Sounds like it reduces stylus wear and noise floor, which is great for those using their lathes a lot to produce multiples.
Any advice from users who practise, or have experimented with, this way of cutting?
here are the questions I was left with after browsing the forum on the matter:
How can the stylus be mounted properly in the head if it is backward? Esp. a Grampian-type which has a flat side that aligns the stylus ... this flat area would not function if backward.
How can the stylus end up at 45 degrees, when using a short-shan stylus, since there is not nearly enough space between the cutterhead and the blank to achieve this.
Are sapphires suitable or only diamonds?
Is a heated stylus useful really? Is it necessary to heat the blank (if using PVC)
How can the stylus be mounted properly in the head if it is backward? Esp. a Grampian-type which has a flat side that aligns the stylus ... this flat area would not function if backward.
I believe Tommi is just really careful about mounting it backwards. I always postulated that you could crush the shank in a vice a little bit and flatten out the other side enough for it to turn.
How can the stylus end up at 45 degrees, when using a short-shan stylus, since there is not nearly enough space between the cutterhead and the blank to achieve this.
Peter is using resharpened victrola needles that are as long as he can get. He sharpens them himself. His cutting head and carriage is different than a 6N, and the needle is inserted towards the rear of the head, therefore, he can lean it back and still touch the disc. I should go back and watch the Youtube video, because it does have a close up on his head as it is cutting.
Are sapphires suitable or only diamonds?
For embossing you only need sapphires, using Tommi's method, Diamonds are used for cutting, not embossing.
Is a heated stylus useful really? Is it necessary to heat the blank (if using PVC)
Could probably help, but not as much as with cutting.
Also, I know Tommi and Peter both use turtle wax to polish the disc before cutting... makes the needle slide a little easier I think.
You get a good view of Peter's cutting head at :42 into this video.
http://www.youtube.com/watch?v=V4H_mLrej4Y
And at 1:47, you'll see a red and yellow labeled record, which was a Jad Fair Record that Peter cut for me a few years ago.
http://www.youtube.com/watch?v=V4H_mLrej4Y
And at 1:47, you'll see a red and yellow labeled record, which was a Jad Fair Record that Peter cut for me a few years ago.

embossing
from my recent experience using lexon and standard steel stylus you dont need to set angle at 45 degrees approx 15 upto 30 degrees will achieve pretty good results after a little practice, I also did some tests without reversing stylus but still tilting the cutting head very little difference,
I warm the disc for a few minutes with 40 watt bulb after spraying with a little anti static cleaning spray.
I have found I need to increase the cutter head depth adjustment
quite a lot to get good results.
emidisc
I warm the disc for a few minutes with 40 watt bulb after spraying with a little anti static cleaning spray.
I have found I need to increase the cutter head depth adjustment
quite a lot to get good results.
emidisc
-
marchingband
- Posts: 34
- Joined: Mon Mar 17, 2008 12:47 am
- Location: halifax, canada

Why isn't pushing down into the blank called "impressing?" "Embossing" usually means pushing up from beneath.
From the wacky-pedia on sheet metal embossing:
"...The term "impressing" enables one to distinguish an image lowered into the surface of a material, in distinction to an image raised out of the surface of a material."
(just saying)
- Spike Marlin
From the wacky-pedia on sheet metal embossing:
"...The term "impressing" enables one to distinguish an image lowered into the surface of a material, in distinction to an image raised out of the surface of a material."
(just saying)
- Spike Marlin
-
marchingband
- Posts: 34
- Joined: Mon Mar 17, 2008 12:47 am
- Location: halifax, canada
Re:
oh sorry, I meant your idea of using a vice to create a flat area on the opposite side of the shank...good idea, sounds hard though.piaptk wrote:I'm not sure what you mean. I didn't say anything about creating a new facet. You just turn the stylus around for tommi's method. Peter grinds the whole tip of the gramophone needle into a pointed cOne.
I have had good luck this week turning the whole cutterhead around.
can anyone elaborate on the method for using turtle wax? I saw the spray bottle product mentioned ... is there a science to this?
yo
-
marchingband
- Posts: 34
- Joined: Mon Mar 17, 2008 12:47 am
- Location: halifax, canada
Re: how-to emboss
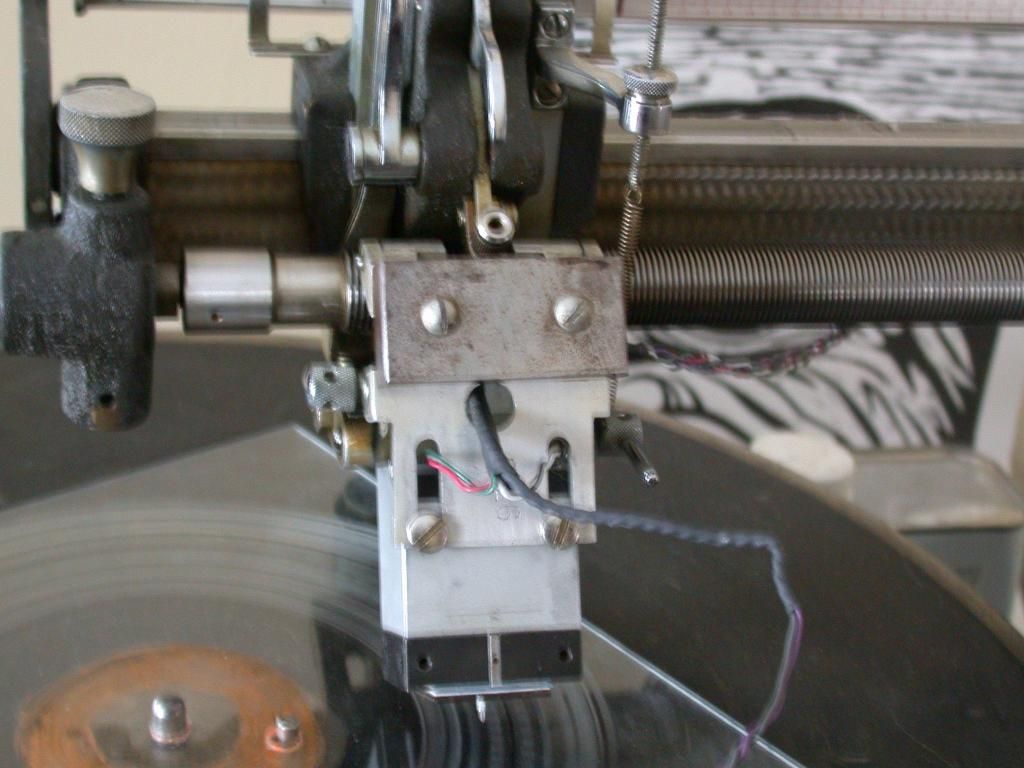
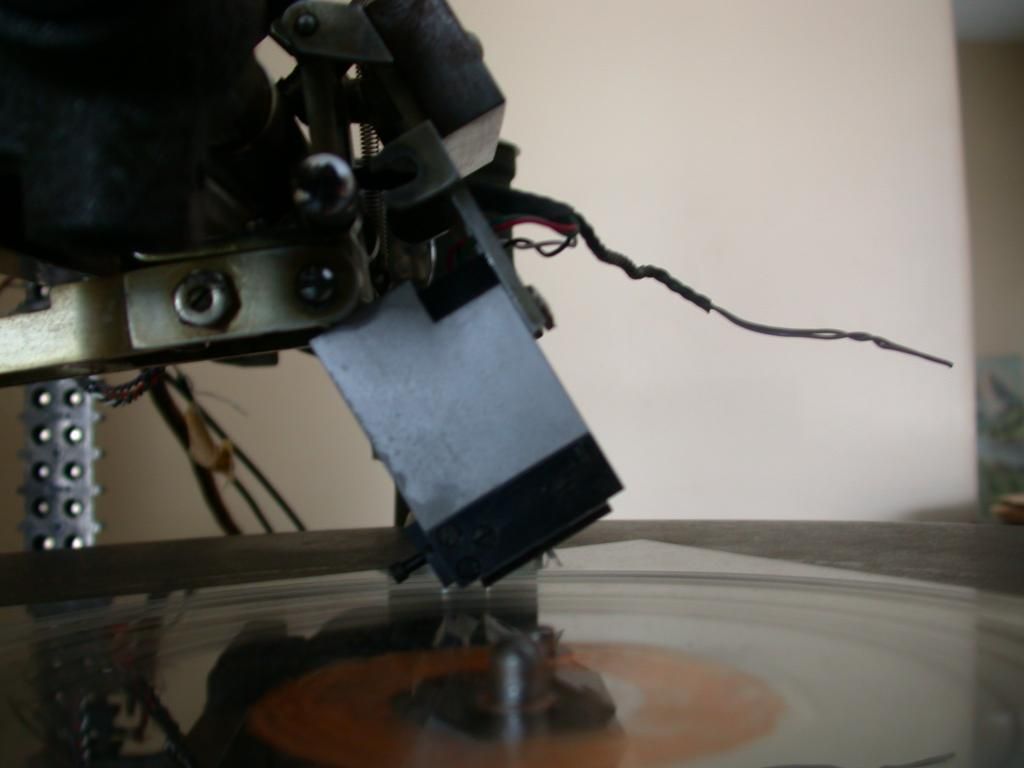
here are photos of head mounted reversed if anyone's curious. Its a grampian cutterhead on a Presto 8DG.
http://i1180.photobucket.com/albums/x410/craftsingles/DSCN1734.jpg
http://i1180.photobucket.com/albums/x410/craftsingles/DSCN1737.jpg
http://i1180.photobucket.com/albums/x410/craftsingles/DSCN1734.jpg
http://i1180.photobucket.com/albums/x410/craftsingles/DSCN1737.jpg
yo
-
Angus McCarthy
- Posts: 760
- Joined: Mon Aug 23, 2010 6:22 pm
- Location: Bloomsburg, PA, USA
Re: Re:
Looking at the video, no more science than "Wax on - wax off!"marchingband wrote:can anyone elaborate on the method for using turtle wax? I saw the spray bottle product mentioned ... is there a science to this?

Re: how-to emboss
WOW that reversed cutter head looks crazy to me.
I've only ever just turned the stylus around.
I've only ever just turned the stylus around.
making lathe cuts on a Presto 6N, HIFI stereo cuts on vinylrecorder
at Audio Geography Studios, Providence, RI USA
http://www.audiogeography.com
at Audio Geography Studios, Providence, RI USA
http://www.audiogeography.com

Re: how-to emboss
My lathe embosser was constructed of a broken photo scanner to use as the scroll. The head is made of 2 dual coil 25 watt Sony flatscreen TV speakers. The onboard amp is a 20 watt stereo Sony PC speaker op amp (THD .05%). The stylus is interchangeable (custom cut glass or sapphire). Power supply is a standard H 13.35 volt DC with heavy filtration (70,000uF) and two 1 amp 7812 12 volt regulators as well as 13 volt lithium power for true DC unplugged portable power. Scroll motor is speed regulated adjustable with 4 reduction steps. Scroll has an auto-stop limit as well as manual stop for the loop groove. The lathe now has stereo VU / signal metres connected to the line level signal in, not the speaker out. The turntable is separate an is an Onkyo CP1027F direct servo drive. There is no way to adjust depth of embossing other than changing the number of washers / weights on the cutter head.

Re: how-to emboss
You appear out of thin air and already have you own working homebrew lathe! Absolutely fantastic. I'll be interested to see how you will continue to improve it.
Cutting, Inventing & Innovating
Groove Graphics, VMS Halfnuts, MIDI Automation, Professional Stereo Feedback Cutterheads, and Pesto 1-D Cutterhead Clones
Cutterhead Repair: Recoiling, Cleaning, Cloning of Screws, Dampers & More
http://mantra.audio
Groove Graphics, VMS Halfnuts, MIDI Automation, Professional Stereo Feedback Cutterheads, and Pesto 1-D Cutterhead Clones
Cutterhead Repair: Recoiling, Cleaning, Cloning of Screws, Dampers & More
http://mantra.audio
Re: how-to emboss
Glass On Lexan http://kiwi6.com/file/u013t5pyf4 . I went back to my glass stylus because it provided more predictable results. This cut was at first a failure then I remembered reading somewhere on here about adding a thin oil prior to embossing, so that is what I did and tried again. This long 11 minute groove was the result. I think I "hit" it just a bit too hot on levels, but I really wanted to get away from noise floor.
Re: how-to emboss
Not bad at all. Are you using a heating lamp at all? That will also help regardless of cutting/embossing/impressing.
If you can find a red heat lamp bulb put it in a lamp with a flexible arm. Position the lamp directly above the disc. Make sure it's light is spread out over the radius of the disc. You only have to heat one side since it is rotating... So, cover half the disc with light. I use a heat gun to determine when the disc is heated up to around 90 degrees F or slightly hotter. The heat helps to make the plastic more pliable and will result in lower background noise.
Another suggestion is to add a heating wire to your stylus. You can order a spool of NiCr wire (I think something like 18 or 20 gauge. Coil it around the base of the stylus and use some dental cement to glue it in place. Apply 12 Volts to a potentiometer in series with an ammeter (current meter) and then to the stylus wire. Wire the pot as a variable resistor and not as a voltage divider. Dial the pot until it reads 0.5 Amps on the ammeter. That will allow the stylus to move through material like a hot knife through butter.
I use commercial car polish. Turtle Wax. They sell it in spray bottles. A very small amount on a microfiber rag. Then wipe the disc and let it dry.
Cutting, Inventing & Innovating
Groove Graphics, VMS Halfnuts, MIDI Automation, Professional Stereo Feedback Cutterheads, and Pesto 1-D Cutterhead Clones
Cutterhead Repair: Recoiling, Cleaning, Cloning of Screws, Dampers & More
http://mantra.audio
Groove Graphics, VMS Halfnuts, MIDI Automation, Professional Stereo Feedback Cutterheads, and Pesto 1-D Cutterhead Clones
Cutterhead Repair: Recoiling, Cleaning, Cloning of Screws, Dampers & More
http://mantra.audio
Re: how-to emboss
I do have nickel/chrome wire wrapped around the stylus seat. It is powered by the 13 volt supply on board. Remember, my lathe is completely portable and cordless if needed. I am considering adding a stereo FM tuner so I can transmit to it wirelessly (using a BA1404 with a 19KHz pilot tone) without line level input, so at that point it would be completely self contained. I looked at some felt pads in a DJ shop and think that will help with any ring dampening. All of this and no consideration to cosmetic alteration LOL
Re: how-to emboss
I require help in knowing what angle my glass emboss stylus should be to prevent the pre-song squeaky I hear please.
Re: how-to emboss
I think between 5 and 15 degree angle.
Cutting, Inventing & Innovating
Groove Graphics, VMS Halfnuts, MIDI Automation, Professional Stereo Feedback Cutterheads, and Pesto 1-D Cutterhead Clones
Cutterhead Repair: Recoiling, Cleaning, Cloning of Screws, Dampers & More
http://mantra.audio
Groove Graphics, VMS Halfnuts, MIDI Automation, Professional Stereo Feedback Cutterheads, and Pesto 1-D Cutterhead Clones
Cutterhead Repair: Recoiling, Cleaning, Cloning of Screws, Dampers & More
http://mantra.audio
Re: how-to emboss
One question, why didn't anyone tell me 20 watts was not enough to emboss efficiently? LOL
I temporarily connected my homemade lathe stylus speakers to a 1971 200 watt stereo tube amplifier and the results were as different as night and day. You people need to inform noobies that power is as important as anything else doing this. LOL Redesign is in order. Will upload results when perfected.
I temporarily connected my homemade lathe stylus speakers to a 1971 200 watt stereo tube amplifier and the results were as different as night and day. You people need to inform noobies that power is as important as anything else doing this. LOL Redesign is in order. Will upload results when perfected.
Re: how-to emboss
Did you mention before that your amp was only 20 Watts. I don't remember reading that. Yes, too little power. The amp rack for my lathe is 350 watts per channel.
Cutting, Inventing & Innovating
Groove Graphics, VMS Halfnuts, MIDI Automation, Professional Stereo Feedback Cutterheads, and Pesto 1-D Cutterhead Clones
Cutterhead Repair: Recoiling, Cleaning, Cloning of Screws, Dampers & More
http://mantra.audio
Groove Graphics, VMS Halfnuts, MIDI Automation, Professional Stereo Feedback Cutterheads, and Pesto 1-D Cutterhead Clones
Cutterhead Repair: Recoiling, Cleaning, Cloning of Screws, Dampers & More
http://mantra.audio