
Thanks for the responses to my questions!
I've scoured this board and have come up with a lot of useful info, thanks to all! I've also bought and read the Boden book as well as the AES papers on the subject.
As for materials, I'm hoping to find a North American source for blank PVC disks and cutting styluses... shipping blanks overseas is too expensive for me.
If anyone has a suggestion on an available cutterhead let me know... none of the commercialized projects I found on this site seem to be available to purchase.
KNOP lathe DIY build
Moderators: piaptk, tragwag, Steve E., Aussie0zborn
Re: KNOP lathe DIY build
Hi new update: built a new cutterhead for a 320 stylus.
This time I used a 1mm drill hole + a proper 1:20 reamer to make the stylus holder. I made a little 3D printed jig for getting the torque tube in the right direction for drilling with a drill press.
I use a cheapo drill press which really is not up to the task regarding accuracy but it (barely) works.
Results: (light red colour is the new cutterhead)
At main resonance there is a slight disturbance, I think this is because the alignment of gluing everything together was not as good as the one before.
Good news: More efficiency above 10K. I think because of the better fit between torque tube and stylus. The previous one was 'hand reamed' using a file, and some glue was needed to attach the stylus. Otherwise the frequency response of the 2 heads follow each other nicely. (All the rest of the head geometry is the same).
Until now I was only able to cut to the same level as a regular +-20min a side LP, but now I hope I will be able to cut a bit louder.
Did a lot of cuts comparing the mono style stylus heads vs the neumann one, and the neumann heads just sound a lot cleaner. There is a box-ieness on the mono stylus heads I cannot seem to get rid of by EQing.
You do not have the required permissions to view the files attached to this post.
-
soeffingodly

- Posts: 273
- Joined: Fri Jan 19, 2018 8:48 am
- Location: Florida, USA
Re: KNOP lathe DIY build
Well done, KNOP!
I've actually gotten some really decent cuts using mono Presto 1C heads rewound by Todd. Sometimes I need to employ the 32-band EQ to really tweak the audio but I can understand what you're saying about "boxiness". What mono heads have you tested with? At any rate, it's been fun watching your progress! (and even attempting a print of the head on an "unsanctioned" 3d printer!) Keep up the great work.
I've actually gotten some really decent cuts using mono Presto 1C heads rewound by Todd. Sometimes I need to employ the 32-band EQ to really tweak the audio but I can understand what you're saying about "boxiness". What mono heads have you tested with? At any rate, it's been fun watching your progress! (and even attempting a print of the head on an "unsanctioned" 3d printer!) Keep up the great work.
"I wasn't lying. Things I said later seemed untrue."
Re: KNOP lathe DIY build
I was referring to my own model cutterhead with a mono stylus. The sound difference with a 320 neumann type stylus is really noticable.
https://www.lathetrolls.com/index.php
This is the new head: looks nice in brown.
Also reweighted the moving mass and is now 4,45 grams. About 1 gram of glue on it , I'll try to use a bit less for the rebuild and try to shave some extra weight to get it down to under 4 grams.
I did some destructive volume tests yesterday. A lot of bg noise but is a chipped stylus I think.
The same song survived at 3dB less volume, but here it breaks down at about 3 minutes. This is with ferrofluid but no fans blowing ( yes they help).
Also noticed that while I can only add ferrofluid to the outer side of the voice coil, If I lift the cones with the funnels attached a lot, the ferrofluid also magically enters the inner side of the voice coil .
.
Here is the audio recording:
https://clyp.it/b2ieetb3
and the original track:
https://www.youtube.com/watch?v=D8XXDiq_Uv0
1Khz test tones at the front are Left Right 1000Hz 5 cm/sec rms test tones from the ortofon test record for reference.
Could anybody also give me some tips to which level this example is being recorded to? I'm really confused regarding reference levels and not really sure.
https://www.lathetrolls.com/index.php
This is the new head: looks nice in brown.
Also reweighted the moving mass and is now 4,45 grams. About 1 gram of glue on it , I'll try to use a bit less for the rebuild and try to shave some extra weight to get it down to under 4 grams.
I did some destructive volume tests yesterday. A lot of bg noise but is a chipped stylus I think.
The same song survived at 3dB less volume, but here it breaks down at about 3 minutes. This is with ferrofluid but no fans blowing ( yes they help).
Also noticed that while I can only add ferrofluid to the outer side of the voice coil, If I lift the cones with the funnels attached a lot, the ferrofluid also magically enters the inner side of the voice coil
Here is the audio recording:
https://clyp.it/b2ieetb3
and the original track:
https://www.youtube.com/watch?v=D8XXDiq_Uv0
1Khz test tones at the front are Left Right 1000Hz 5 cm/sec rms test tones from the ortofon test record for reference.
Could anybody also give me some tips to which level this example is being recorded to? I'm really confused regarding reference levels and not really sure.
You do not have the required permissions to view the files attached to this post.
Re: KNOP lathe DIY build
Hi everyone.
I spent the day trying different EQ settings for cutting and got some good insights. I used to use an auto EQ between recorded white noise and virtual real white noise but I will never do that again. Did a lot of quite elaborate EQ in but in the end the best result was quite a simple solution.
The results using auto EQ using a cut track with the song you cut without any EQ and the original track sounded WAY better.
This is using my old white head (cause my newest head still needs to be repaired) with the mono style shank.
You can have a listen here: (cut vs original): https://clyp.it/no2ctnof Still not 100% but getting closer
-
Fela Borbone
- Posts: 271
- Joined: Thu Mar 07, 2013 5:22 pm
- Location: Valencia, Spain
Re: KNOP lathe DIY build
wow! well done!
Re: KNOP lathe DIY build
Amazing project! Congratulations on your many successful builds. I had some ideas about using those kinds of 3D printer transports and so I'm happy to see that it can be done without excessive stepper noise transferring into the axis. Do you have more details about the mechanism used to connect the transport to the head? To set the balance point etc.. (If this has already been discussed, or is common knowledge then apologies.)
-
planckepoch

- Posts: 10
- Joined: Wed Mar 06, 2019 4:06 pm
Re: KNOP lathe DIY build
hi knop,
great build - I'm trying to learn about the torque tube design but have difficulty in been able to understand the torque tube. no one shows the rear of the torque tube and how the piano wire is connected to it. would you be able to share a picture or info? I've scoured the forums but it seems everyone is interested in showing the stylus and push rod assembly more than the connection to the back.
I was thinking of some kind of spring collet to clamp the piano wire but I don't know if this is the way to go or whether it is simply held in place with a set screw or perhaps I'm way off on the whole thing!
never had access to a lathe or cutter so it's basically me trying to reverse engineer from photos!
-
urieldeveaud
- Posts: 13
- Joined: Tue Mar 17, 2020 6:13 pm
Re: KNOP lathe DIY build
Amazing project(s) ! learn so much and nice pictures... congrats !

KNOP lathe DIY build with membrane-free drivers
Dear Community,
just a small add-on to the topic.
I realized KNOP's construction with some small modifications:
~ using DC motor instead of stepper in order to have a smooth slide. I use a hand-cranked generator connected reverse.
~ the original plan with funnels is great, but a lots of the frequencies were resonated in these objects, so I decided to rethink the idea, using membrane-free drivers (Visaton EX 30 S) and connect them with simple M3 screws to the torque tube. Same size, little changes in the cutter head. If somebody's interested, i can share the .skp file.
~ i don't have access to 'normal' cutting needles and PVC materials, therefore currently i work with diamond dental drills on polycarbonate discs, without extra heating and vacuum suction. Currently it's o.k. for learning and experimenting.
I think the machine works well. It needs lots of fine-tuning with the EQ, and probably a normal cutter stylus and vinyl materials... If somebody can help me how and where to buy them, please... I need a webshop what really works and not only looks working but in fact it's a phantom like http://analoguevinylrecords.com/, https://www.myshank.com/en/, https://www.diamond-cutting-stylus.com/ or https://www.vinylrecorder.com/....
Many thanks again to Knop for let me brave enough to start this project.
(and also to the Vinylrecorder man who regarded me as a piece of broken steel needle when i tried to buy his machine... so i could learn a lot and also spend those thousands of euros for something better)
If You're going to reconstruct it, and need some help to find parts (for ex. Spirol inserts), just let me know.
You do not have the required permissions to view the files attached to this post.
-
grooveguy

- Posts: 430
- Joined: Thu Jun 22, 2006 5:49 pm
- Location: Brea, California (a few miles from Disneyland)
- Contact:
Re: KNOP lathe DIY build
Good work, XRC; thanks for the link to those drivers. Their datasheet shows only a flat surface to attach to, are you simply epoxy-ing to that, or did you drill and tap? Do you have an audio file sample of your results? Do keep us updated.
Re: KNOP lathe DIY build
Hi Grooveguy,
yes, i just simply epoxy'd them. They're stable.
Since that i burnt out both speakers (overheating... they shut down permanently around 48 celsius), so i'm going to reassemble it.
I hope i can close the quality of the sound samples posted above, and then i'll be also proud to post them here.
All the best:
Balázs
-
grooveguy
- Posts: 430
- Joined: Thu Jun 22, 2006 5:49 pm
- Location: Brea, California (a few miles from Disneyland)
- Contact:
Re: KNOP lathe DIY build
Good, Balázs; we all look forward to your success and full information. Thanks!
Re: KNOP lathe DIY build
Dear Grooveguy,
sorry for the late reply: i had to work out some questions and problems.
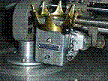
Since that
- my father in law helped me out to build a better contact between the exciter (i call it resonator speaker) and the torque with M3 16mm screws (see image), so there's no need to epoxy on the torque side anymore;
- i switched to diamond cutter stylus of myshank (I use462), so i can cut in stereo!
- i felt some phase-cancelling before so i played with phases, and found that it's a very good jump in sound to switch positive and negative on one channel going from the PA to the head!
The audio quality is much much better than before, so i can recommend to use resonators/exciters with it (for me membrane based ones created fragmented grooves). The exciter speakers needs more bass, therefore the iRIAA curve should be adopt to have +12dB or more on the freqencies below 1KHz.
I plan to develop EQ settings, otherwise the device seems to be ready to fine tuning and use it.
Many thanks againg for every info! If I can help for somebody, please let me know.
Some sounds:
sorry for the late reply: i had to work out some questions and problems.
Since that
- my father in law helped me out to build a better contact between the exciter (i call it resonator speaker) and the torque with M3 16mm screws (see image), so there's no need to epoxy on the torque side anymore;
- i switched to diamond cutter stylus of myshank (I use462), so i can cut in stereo!
- i felt some phase-cancelling before so i played with phases, and found that it's a very good jump in sound to switch positive and negative on one channel going from the PA to the head!
The audio quality is much much better than before, so i can recommend to use resonators/exciters with it (for me membrane based ones created fragmented grooves). The exciter speakers needs more bass, therefore the iRIAA curve should be adopt to have +12dB or more on the freqencies below 1KHz.
I plan to develop EQ settings, otherwise the device seems to be ready to fine tuning and use it.
Many thanks againg for every info! If I can help for somebody, please let me know.
Some sounds:
You do not have the required permissions to view the files attached to this post.
Re: KNOP lathe DIY build
hi
long time lurker here, is there any update on this?
long time lurker here, is there any update on this?
-
grooveguy
- Posts: 430
- Joined: Thu Jun 22, 2006 5:49 pm
- Location: Brea, California (a few miles from Disneyland)
- Contact:
Re: KNOP lathe DIY build
I feel like I dropped the ball, not getting back to Balázs after his last post, but anyone should feel free to chime-in here. That was a very good demo, and the material showed off response and separation. I guess I am not surprised at the performance, although it departs dramatically from what I've been trying with stereo cutterheads. Balázs uses a very stiffly-sprung 'motor' assembly, which is pretty much what the professional heads do as well. This means that his head requires considerable power, and his drivers have to be able to deliver it without overheating. But it certainly works fine, and his EQ is probably quite simple. My designs, on the other hand, use small drivers and much lighter-weight and compliant mechanics, and rely on mechanical (rubber) damping and very convoluted EQ to achieve flat response. Based on what I heard here, I may well change my approach.
Balázs, I'm assuming that your test used the diamond cutting stylus and an appropriate blank, not the embossing stylus shown in your photo. Just wondering what quality you can achieve with embossing and this head. Can you confirm this and possibly tell us what your drivers (transducers) are? Good work!
Balázs, I'm assuming that your test used the diamond cutting stylus and an appropriate blank, not the embossing stylus shown in your photo. Just wondering what quality you can achieve with embossing and this head. Can you confirm this and possibly tell us what your drivers (transducers) are? Good work!
-
2bitcomputer

- Posts: 68
- Joined: Tue Sep 06, 2016 2:53 am
Re: KNOP lathe DIY build
Hello, I have a question about which exciters to use if I build a head like this.
The exciters xrc used are 10W but this company (visaton) also makes one that is rated for 50W:
https://www.visaton.de/en/products/drivers-accessories/structure-borne-drivers/ex-80-s-8-ohm
Is there an advantage to using the 50W version?
would it run cooler than the 10W version?
Thanks...
The exciters xrc used are 10W but this company (visaton) also makes one that is rated for 50W:
https://www.visaton.de/en/products/drivers-accessories/structure-borne-drivers/ex-80-s-8-ohm
Is there an advantage to using the 50W version?
would it run cooler than the 10W version?
Thanks...
-
grooveguy
- Posts: 430
- Joined: Thu Jun 22, 2006 5:49 pm
- Location: Brea, California (a few miles from Disneyland)
- Contact:
Re: KNOP lathe DIY build
Thanks for the link, 2bit. I think that Balázs would have to tell us if his 10W units heat up at all, but if they don't, there would really be no advantage to going to bigger ones, and the extra weight in the head might present problems. Let's see what he says. By the way, are those available through distribution, or available only from the manufacturer?
Re: KNOP lathe DIY build
Hi,
Maybe the 50 watt unit would be better, but probably not. The reason is that as you make the driver bigger and able to handle more power, the moving mass typically gets larger. The bigger driver may even have a better BL product (the force generated by each amp of current in the coil), but that advantage might be eaten up by the additional mass. You might remember that: Force = Mass x Acceleration. So as the moving mass increases, you need that much more force to be generated by the driver to accelerate it as compared with the smaller driver. You would have to run the numbers to see if it is worth it. From my experience, I have not found that to be the case. The bigger driver may work fine, but it might need much more power to do the same job as the smaller, lower powered driver. In many cases, you will find that the smaller driver actually works better.
Mark
-
grooveguy
- Posts: 430
- Joined: Thu Jun 22, 2006 5:49 pm
- Location: Brea, California (a few miles from Disneyland)
- Contact:
Re: KNOP lathe DIY build
Thanks for that insight, Mark. I'm still in the dark as to the bracket-spring that connects the stylus-holder to the backplate. Balázs's photos show a definite anchor wire to prevent fore-to-aft (Z-plane) movement of the stylus, but I'd like to understand the compliance of the leaf-spring part and how it is able to allow angular movement in all X/Y directions. I usually just bury everything in rubber but am rethinking that. Others who have posted in these pages have boasted of how lightweight all driven assemblies are, but in this latest iteration, Balázs seems to have a lot of metal to move, and it certainly doesn't seem to compromise performance. Comments?