The dark art of diamond sharpening

Anything goes! Inventors! Artists! Cutting edge solutions to old problems. But also non-commercial usage of record cutting. Cost- effective, cost-ineffective, nutso, brilliant, terribly fabulous and sometimes fabulously terrible ideas.

Moderators: piaptk, tragwag, Steve E., Aussie0zborn

User avatar
juba bc
Posts: 71
Joined: Thu Nov 06, 2014 8:58 am
Location: Brazil

Re: The dark art of diamond sharpening

Post: # 67091Unread post juba bc
Wed Mar 19, 2025 1:47 pm

Image
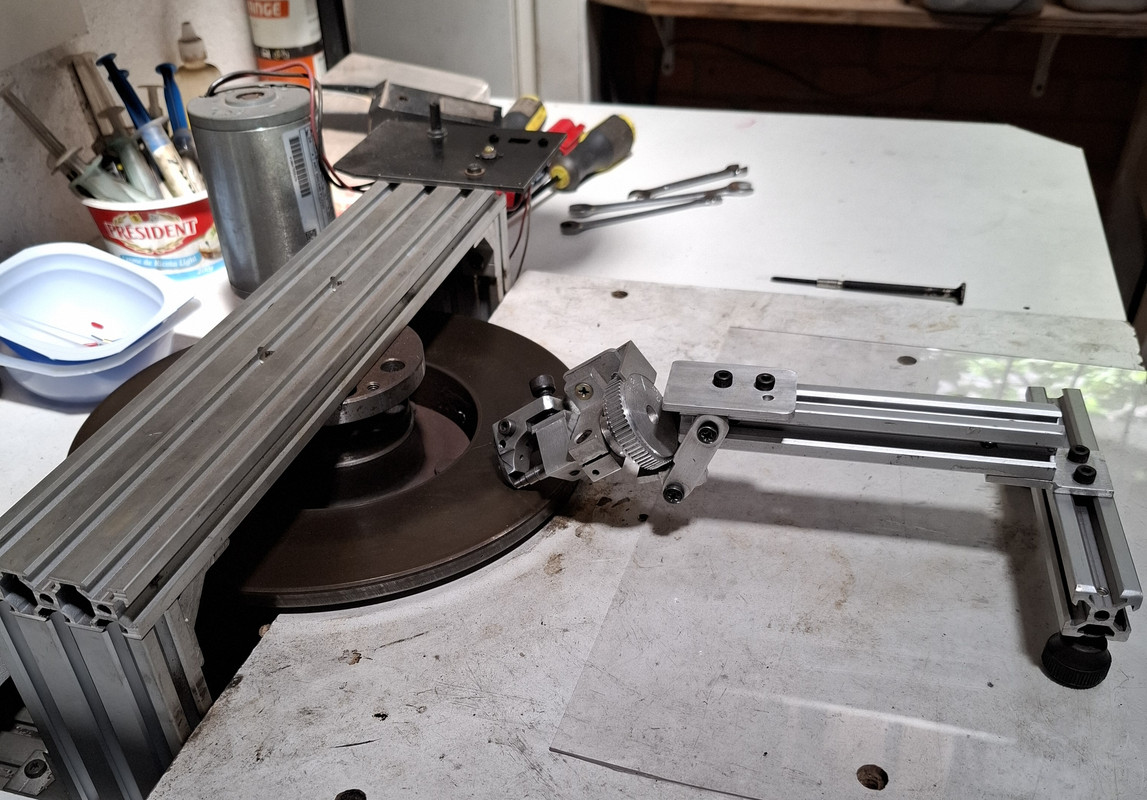
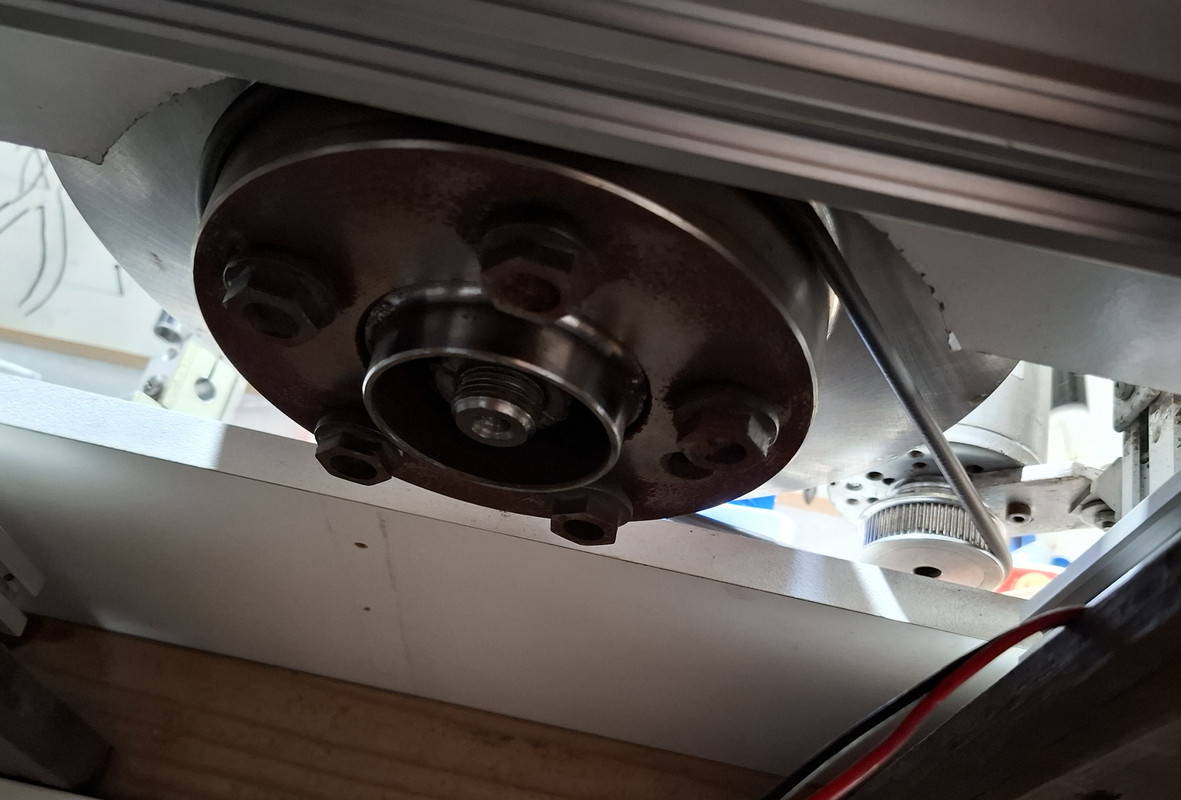
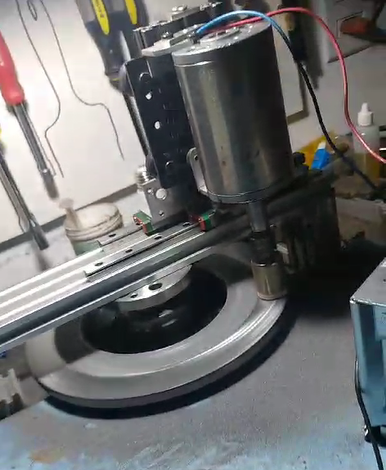
A brake disc driven by a belt was then used, I use a dc motor with rotation and direction control, the screws that hold the disc were cut and worked to have exactly the same weight and avoid vibration

User avatar
jjwharris
Posts: 200
Joined: Fri Jun 02, 2017 5:18 am

Re: The dark art of diamond sharpening

Post: # 67092Unread post jjwharris
Wed Mar 19, 2025 4:13 pm

juba bc wrote:
Wed Mar 19, 2025 1:42 pm
Image
I’m very interested in your gem holder - have you constructed this yourself?

If working with cast iron at higher speeds it probably pays to check the compression strength, I was warned by a few machinists that spinning cast iron at high speeds can be dangerous if the incorrect grade is selected. I’m fairly confident in the grade I selected, but it was pretty scary spinning it up unbalanced.

Lately I’ve noticed the scaife itself has become dished - another reason I’ve put it on hold. The surface gouges fairly easily, if the diamond has hard/sharp edges, so they do need to be knocked off before being used on the cast iron.

In the future I’m looking at making a linear slide with a diamond grinding disc attached to a stable bearing to resurface the disc so it’s true to the face of the cast iron scaife.

It’s probably also worth mentioning is that these surfacing procedures do create a lot of iron dust, so it would be worthwhile having some form of isolation from electro-magnetic devices!

My cast iron selection was based on this webpage;

http://www.gemworld.com/CastIronLapPrep.asp
Record Lathe Embossing Supplies + Embossed Records - http://www.johnnyelectric.co.nz/

User avatar
Stylus Maker
Posts: 15
Joined: Mon May 27, 2024 6:38 am

Re: The dark art of diamond sharpening

Post: # 67093Unread post Stylus Maker
Thu Mar 20, 2025 4:03 am

Having seen your setup, I noticed the following. Your handpiece lacks a grain finding swivel. The poiishing face needs to be rotated parallel to the wheel full 360 degrees. The wheel is too low a quality cast iron. It needs the a very fine grain cast iron scaife called a "Turbo Scaife". It also needs to be entirely balanced dial indicated on the spindle centre and height. It also needs to be highly polished and totally scratch free.The bearing on the spindle would be a low pass. Speed about 2000 RPM would be OK. Took me 3 years to get to that level,now I get 98 out of 100 stylus pass the cut test.

User avatar
juba bc
Posts: 71
Joined: Thu Nov 06, 2014 8:58 am
Location: Brazil

Re: The dark art of diamond sharpening

Post: # 67094Unread post juba bc
Thu Mar 20, 2025 7:35 am

replying JJ Wharrys, yes the support to hold the diamond was built with scrap parts, it is still being improved, thank you Stylus Maker, your information is very useful, my configuration is just a starting point that now needs to be improved according to the information and knowledge that I acquire

User avatar
Estrada
Posts: 99
Joined: Fri Sep 21, 2007 5:26 am

Re: The dark art of diamond sharpening

Post: # 67099Unread post Estrada
Thu Mar 20, 2025 2:58 pm

juba bc wrote:
Wed Mar 19, 2025 12:20 pm
Hi, I did this experiment using a car brake disc, it's not as flat as I imagined and it was necessary to make some corrections, but it worked, I made some points successfully, I still can't get a perfect sharpening without any noise but I believe that more dedication is needed, and I hardly have time for that. As soon as possible I will put the project images here, I have no intention of working with stylus sales
Thanks for sharing this Juba bc. Really cool to see that someone else had the same idea as me, and got further with it. Let us know if you are able to have any further success.
Stylus Maker wrote:
Thu Mar 20, 2025 4:03 am
Your handpiece lacks a grain finding swivel. The poiishing face needs to be rotated parallel to the wheel full 360 degrees.
Thanks stylus maker, really value your input. What kind of handpiece are you using? I've had a look at MGM Dops but I'm a bot confused by all the different options.

User avatar
juba bc
Posts: 71
Joined: Thu Nov 06, 2014 8:58 am
Location: Brazil

Re: The dark art of diamond sharpening

Post: # 67100Unread post juba bc
Thu Mar 20, 2025 3:57 pm

Image
I forgot to post before, here was a device to flatten and remove marks from the disc, without the need to remove it from place

User avatar
Estrada
Posts: 99
Joined: Fri Sep 21, 2007 5:26 am

Re: The dark art of diamond sharpening

Post: # 67101Unread post Estrada
Thu Mar 20, 2025 4:12 pm

Cool, thanks for sharing that juba bc. I use the milling attachment from my Emco lathe to flatten my discs as seen in this photo
IMG_7438.JPG
You do not have the required permissions to view the files attached to this post.

User avatar
Stylus Maker
Posts: 15
Joined: Mon May 27, 2024 6:38 am

Re: The dark art of diamond sharpening

Post: # 67103Unread post Stylus Maker
Thu Mar 20, 2025 7:55 pm

I use Indian made excellent make handpieces from HDPL $150 to $180 USD. You can get motors benches and discs there as well.

User avatar
Estrada
Posts: 99
Joined: Fri Sep 21, 2007 5:26 am

Re: The dark art of diamond sharpening

Post: # 67107Unread post Estrada
Fri Mar 21, 2025 4:02 pm

Stylus Maker wrote:
Thu Mar 20, 2025 7:55 pm
I use Indian made excellent make handpieces from HDPL $150 to $180 USD. You can get motors benches and discs there as well.
Is there a particular type of tang that works best for this? They HDPL do look like good quality

User avatar
Stylus Maker
Posts: 15
Joined: Mon May 27, 2024 6:38 am

Re: The dark art of diamond sharpening

Post: # 67108Unread post Stylus Maker
Sat Mar 22, 2025 1:21 am

You need your disc to look like this.
You do not have the required permissions to view the files attached to this post.

User avatar
Stylus Maker
Posts: 15
Joined: Mon May 27, 2024 6:38 am

Re: The dark art of diamond sharpening

Post: # 67109Unread post Stylus Maker
Sat Mar 22, 2025 1:28 am

I like this one.
You do not have the required permissions to view the files attached to this post.

User avatar
jjwharris
Posts: 200
Joined: Fri Jun 02, 2017 5:18 am

Re: The dark art of diamond sharpening

Post: # 67111Unread post jjwharris
Sat Mar 22, 2025 6:06 pm

Stylus Maker wrote:
Sat Mar 22, 2025 1:21 am
You need your disc to look like this.
I'm trying to get to grips with that a prepared scaife should look like, can I ask, if this photo taken as it is spinning?

I've been experimenting with different surface preparations before charging my cast iron. Yesterday I tried cleaning it with acetone and soapy water, then applying ferric chloride as it was (slowly) spinning, with the thought that this would provide some micro-pores for the diamond grit to sit.

I've tried mashing it in with a piece of brass, which I was expecting to change the colour of the scaife somewhat, however the brass colour only appeared after I decided it had failed and I cleaned with, then reapplied ferric chloride.

Here is the wheel pre-etching;
PreEtch.jpg
Here it is after the first etch (about 5 minutes of ferric chloride on the surface)
Etch1.jpg
Here it is after the second etch
Etch2.jpg
Here it is after I added a paste of W5 grit mixed with vaseline, pressed it in with a 20mm bearing on an 8mm rod and wiped it off with a cloth
483686481_1325937148627194_4730407760227855086_n.jpg
I haven't tried shaping a diamond on it yet, as I am waiting for these to arrive;
PinVice.png
I'd love to buy a proper dop, but at the moment I'm a bit broke, I'd prefer to get a little bit more confidence and cash before I make the jump, I believe I can adapt this to a thread which should give me a reasonable amount of gripping strength while hopefully sinking some heat from the grinding process and furthermore hopefully prove some viability in my methods.

Keep in mind I'm intending to make a second machine for the final polishing stage, which will be free from contamination from coarser grits. (I'm looking at W0.2 grit for that stage)
You do not have the required permissions to view the files attached to this post.
Record Lathe Embossing Supplies + Embossed Records - http://www.johnnyelectric.co.nz/

User avatar
Stylus Maker
Posts: 15
Joined: Mon May 27, 2024 6:38 am

Re: The dark art of diamond sharpening

Post: # 67112Unread post Stylus Maker
Sat Mar 22, 2025 6:20 pm

The scaife was spinning. Ive polished normal cast iron that good too.Ive got specialised tools that I made that I cant make anymore as I no longer have the machinery to do it.

User avatar
Stylus Maker
Posts: 15
Joined: Mon May 27, 2024 6:38 am

Re: The dark art of diamond sharpening

Post: # 67119Unread post Stylus Maker
Sun Mar 23, 2025 5:25 am

This is the result using the red tang and the polished scaife
You do not have the required permissions to view the files attached to this post.

User avatar
Estrada
Posts: 99
Joined: Fri Sep 21, 2007 5:26 am

Re: The dark art of diamond sharpening

Post: # 67121Unread post Estrada
Sun Mar 23, 2025 4:04 pm

That looks great. I assume you are getting good results cutting. Is the dull section on the outer edge of the scaife a courser grit of diamond? What size grit are you using here?

User avatar
Stylus Maker
Posts: 15
Joined: Mon May 27, 2024 6:38 am

Re: The dark art of diamond sharpening

Post: # 67122Unread post Stylus Maker
Sun Mar 23, 2025 4:35 pm

The outer ring is 8000 with olive oil. The middle ring is the running ring 50,000, the centre ring is for finishing and is 50,000.

User avatar
Estrada
Posts: 99
Joined: Fri Sep 21, 2007 5:26 am

Re: The dark art of diamond sharpening

Post: # 67124Unread post Estrada
Sun Mar 23, 2025 6:32 pm

Thanks for sharing that. What do you mean by running ring?

User avatar
PhilFW
Posts: 3
Joined: Fri Sep 04, 2020 6:09 pm

Re: The dark art of diamond sharpening

Post: # 67125Unread post PhilFW
Sun Mar 23, 2025 7:00 pm

Brilliant and informative thread.
I have a question about stage 1 ie. attaching the diamond or sapphire to the shank. I reckon vacuum brazing will be beyond most DIYers. I guess people will be using adhesive. I have been slicing up sapphire watch glasses to make blanks - it is a cheap source. Though something of a nuisance given they are,well, circular. Drilling out the shank and slipping the blank in is a tricky procedure. I think it would be probably easier to drill and fix the blank first and then turn the shank down to final diameter. It would be a good way to maintain concentricity. It would be interesting to hear how you guys deal with this initial stage.

cheers

User avatar
Estrada
Posts: 99
Joined: Fri Sep 21, 2007 5:26 am

Re: The dark art of diamond sharpening

Post: # 67126Unread post Estrada
Sun Mar 23, 2025 8:20 pm

I did find a source of sapphire rod which is here
https://www.swissjewel.com/product/sapphire-ruby-rods-tubes/rods/sp-11a/

I haven't purchased any as I have a few old sapphires at home I can play with. Looks like they can provide blanks at an almost reasonable price.

Mounting into the shank is something I still struggle with a bit. I'm forming my shanks, which are presto style, with 1.6mm tig welding rod. I usually drill a centre hole around 0.8 - 0.85mm. With the diamonds you are literally fitting a square peg into a round hole. I usually try to get them to fit as tightly as possible, I find that if they are a bit tight and need to be slightly forced in then they are more likely to stay put. The only issue with presto style shank is that you have to get the mirror face parallel with the indexed face of the shank. I've got a little jig to help with this, I can post some photos later.

At this stage I am just using super-glue to hold the diamond on place. This basically works, though I'm not using stylus heating. I think a low viscosity epoxy might be the way to go.

The big question is when to mount the diamond into the shank. I've tried mounting the blank before any shaping and going through the whole process with it in the shank. This can work, though the diamond is more likely to fall out with heat build up, especially since I'm only using super glue at this point. I've also completely sharpened a diamond before mounting into the shank. This also works, but you have to be really careful as it's so easy to damage the sharpened stylus while fitting it. This might be easier if I had better tools. I've also done the main shaping stages and then mounted the stylus into the shank before doing the final polishing. What does everyone else do?

User avatar
Stylus Maker
Posts: 15
Joined: Mon May 27, 2024 6:38 am

Re: The dark art of diamond sharpening

Post: # 67127Unread post Stylus Maker
Mon Mar 24, 2025 7:40 am

Im grinding the sapphire watch glasses into rods of 1mm. I have a special tool but havent gone any further. I will do sapphire this year. I clamp diamonds into the same tools used by diamond gem cutters to hold the loose blank. I modify it to hold the blank either 0.6mm or 0.7mm. I make my own mounting holders for the finished stylus and use a special jig. I use permabond resin. Same resin used to hold diamond crystals for bruting.

Post Reply